Showing posts with label Easy. Show all posts
Monday, August 31, 2015
Easy Breakfast To Go: Yogurt Parfaits
These are easily one of my favorite breakfasts. The combinations are endless and they can be made in a variety of containers to fit your needs. They are perfect in a coffee cup with a lid to go with my husband or in a sweet, pretty cup to savor myself after dropping the kids off at school. I can send them with the kids to school if they are craving a home breakfast but just didn't get ready in time. My oldest will take them on the bus. You can even prep them for a yummy summer or after school snack.
Simply layer your ingredients one at a time until you get to the top and enjoy!
Things we like to add to our yogurt and granola:
Blueberries
Blackberries
Shredded Coconut
Chocolate Chips
Bananas
Peanut Butter Chips
Almonds
Walnuts
Strawberries
Kiwi
Peaches
Dried cranberries
Raisins
Chopped dried apricot
Tuesday, August 25, 2015
5 Minute DIY Mason Jar Make-up Brush Holder
I love my makeup brush holder. It even made the cut to move into the new house. The sweet little patterned jelly jars are some leftovers from my mason jar chandelier and I believe at one point I got them to make homemade jelly. I still haven't made homemade jelly or jam or preserves. Someday.
I choose an antique white spray paint that I already had, oh my am I cheap. I sprayed the inside and top first and let it dry. Then I turned it upside down and did 2 good coats. After that was dry I did a little touch up spray on the rim just to be safe. That's it. Took maybe 5 minutes of actual work, my kind of DIY! I ordered some mirror effect spray paint and I can't wait to use it...I just have to finish the whole moving thing.
Tuesday, May 19, 2015
Top 18 Travel Tips for Driving with Kids
I recently had a friend post on Facebook looking for advice on driving across country with their three kids when they move later this year. I think I could have written a book! Two years ago we traveled from OK to OR and back again in 10 days and the kids were 10,7,4 and 3. Oh my word, it was fun and we survived! So I compiled a list just for you with my travel tips. They don't involve wrapping up small gifts for each hour you are in the car (this mama doesn't have time for that, but I am totally impressed if you do) and I don't bribe for good behavior, you should be good because it's the right thing to do. Kids today are lucky they have all these fun devices to play on!
- DVD's. Okay this one is a no brainer right? If you don't have one, ask your friends or family if they have one you could borrow, barter or rent. Did you know that you don't have to pack any of your own DVD's? We used Redbox the whole time! You can download their mobile app and plan your gas/food/breaks for places that have them. Wal-Mart's usually do and while I am not a Wal-Mart shopper on the norm, it will suffice when we are traveling!
- A sturdy kid potty. The kind that you use to potty train with. This one is similar to the one I have, but they don't make mine anymore (what? why???). The point is for it to be small and compact without a back, so you can put it in a re-usable shopping bag with wipes, toilet paper, clorox wipes and extra plastic shopping bags. If it doesn't have a back then you can use it too. Middle of nowhere, you better believe I used it! Some of the best stops were in the middle of nowhere doing business in the woods.
- Extra clothes in zip lock bags for when there is an accident. If its pee or vomit, you don't want that leaking out of a bag you tie up.
- A positive attitude and a sense of adventure. If you are nervous, they will see right through you.
- Snacks that your kids normally eat. Some people say to bring lots of candy or treats. The last thing I want in the car is my kid on a sugar high who then gets a tummy ache. No thanks!
- Markers if its summer time. Crayons if its winter.
- I let them pick new coloring/activities themselves. Sometimes when I pick something for them they aren't as into it as I thought they would be.
- Are we there yet? Give them the schedule. Very important for my oldest to know where we are going and when we would get there. You can even download a map app for them to look at or print off your own "map" coloring pages.
- Plan rest stops for parks if the weather is nice or Chick-Fil-A for an inside day. A lot of times its more about moving around then it is about eating for the kids. We stopped once outside of Colorado and the sky was so big and blue and beautiful I could have stayed right there forever. Those are the times when memories are made.
- Wear comfortable clothes (ones that would be okay to sleep in) and shoes that are easy to get on and off. Regan was a big fan of wearing her pajamas all day. Worked for me. She was happy and it really felt like a vacation I think for her.
- Don't try to fit too many miles into one day. I know that I could travel with just me and the hubs and crank out a ton of miles and be fine...the kids just get cranky, which is no fun for anyone.
- Try and book hotels with pools. Again, this is just so they have a place to move around. It's often hard to sleep after you've been in the car all day. This really wears them out so they (and you) can get some solid sleep.
- Eat dinner in your hotel if you are just beat and not up for social graces. We found a local pizza shop in a small town in Idaho and had a party in our room one late night. It was great pizza, we didn't care if they ate in bed and everyone was happy.
- Instead of buying more stuff for them to do in the car you can let them purchase a new game. movie or app for their tablet. They only get paid apps when they get a gift card or something in our house. Let them know ahead of time what their app purchase amount limit is.
- Bring an inflatable air mattress for the hotel if you have a bunch of kids. I don't think we have ever checked in as 2 adults and 4 kids. Mainly because they will tell us that we need two rooms. I don't think so! Especially when we are just passing through. A couple of good quality air mattresses that fill up on their own (you just plug them in) really serve us well. The kids already have extra blankets and pillows so we just bring a couple up with us. It also helps that the kids can have their own space. Sometimes you don't get good sleep when you share.
- If they have a breakfast buffet in the morning and its been a late night, usually the hubs and our oldest child, will go down and load up as much as they can, bring it up and then go back and do it again. That way we don't miss breakfast because we are still getting kids (or myself) ready and you can have breakfast in bed! Pack up and eat at the same time. No rushing and no forgetting stuff.
- Keep electronics in one spot and have a reusable checklist for each stop. You could even have an electronics bag that houses all electronics upon pack up. We totally left a tablet at a non-Disney hotel in Anaheim and of course cleaning never found it. At the point we realized it was left, we wouldn't have made it home on time if we had doubled back.
- A small container for the laundromat with essentials. Use an empty drink mix container to put dryer sheets, detergent pods and quarters in. If you need to use the laundry at the hotel or because someone barfed all over their car seat cover you will be totally prepared to stop, strip and wash. You can also pack lighter and/or arrive home with clean clothes by doing laundry as you go! We stayed in a hotel off of Hwy 1 and grabbed a six pack from a convenience store and hit the laundry mat. Best beers and we were good to go with clean clothes for the rest of the trip.
| The boys at the potty break spot. |
Can you survive? You betcha. And if all those don't work, take turns driving and sitting in the passenger seat with headphones in. And remember that its not just about the destination, but the journey as well.
| On her way to the potty break spot in her pajamas and shoes. It was a breathtaking potty break! |
Labels:
Adventure,
camping,
Easy,
hotels,
Kids,
life hacks,
Mom to Mom,
parenting,
travel,
vacation
Thursday, January 15, 2015
Happy Hunger Games {Free Printable PDF Banner}
Happy Hunger Games! We love the Hunger Games so much in our house that Ethan's last birthday was Hunger Game themed. You can read more about the party here. Today I am giving away the Hunger Games banner we made for his party (click on the link under the picture to download)! It is a burlap background with black letters. Simple and sweet! If you want a custom made printable burlap banner visit our Etsy shop Three Magee.
.png)
Download Here!!!
.png)
Download Here!!!
Labels:
Burlap,
DIY,
Download,
Easy,
Free,
Hunger Games,
Party,
PDF,
Printable,
Three Magee
Friday, December 26, 2014
Coconut Oil Waffles
Oh my goodness. I have never in my life been asked for more waffles than I was this past Sunday. Everyone wants more and more and more of these. So I happily obliged and we had breakfast for dinner again. Now homemade is relative here. Homemade to me is making them with my waffle iron instead of pulling them out of the freezer and putting it in the toaster. I love Krusteaz Belgian Waffle Mix (no paid sponsorship or affiliation here I just love it, but I wouldn't be upset if they sent me a free box or some coupons!). I change up their recipe and add coconut oil instead of vegetable oil. The result is a sweeter and healthier option. Which according to my family is amazing! I also use the Coconut Oil Pam spray for the waffle maker for an added touch of yum.
Labels:
children,
coconut oil,
cooking,
Easy,
family,
Food for Blog,
waffles
Tuesday, February 4, 2014
Ellie's Brave Party
It's February and Ellie's birthday party was a few months ago. I have found that October through March is some sort of time warp and everything seems to be moving so fast that I have a hard time keeping up with whats going on and an even harder time documenting it. I think that I enjoy planning her parties the most...so far. We usually have the same vision of where we want it to go. We both knew that we wanted it to be simple and fun and most importantly special. So here is her party in pictures...enjoy!
| Bear claw cupcakes: chocolate frosting and almond slivers |
| Wisps: blue cellophane, balloons and a lightstick. I had them through out the neighborhood leading people to our house! |
| Chocolate cake with almonds on the outside. Green coconut grass. Marshmallow fondant stones. |
| I used an oval wood cutting base and got lucky that the number 8 was blue or wisp colored. |
| Bear paw cupcakes and a picture of the birthday girl with Merida from Disneyland! |
| Such a silly gal! |
| The girls wore their favorite dress up clothes- Ellie was Merida of course! |
Monday, March 4, 2013
How to Make Your Own Homemade Butter
Today is perhaps the best Monday in quite awhile. This morning we woke up in our new house. It is Regan's 4th birthday. My Mom, who is continuing on her fight against cancer, doesn't have to have surgery today! And it's my 300th post. So I'm going to share with you just how easy it is to make your very own homemade butter because making homemade butter is one of the most satisfying things to make!
What you need:
The time it takes to go from cream to whipped cream to butter will vary depending on how much cream you use and how cold your mixer bowl, whip and cream are. I'm usually done in 15 minutes, start to finish. To make butter faster, put your mixing bowl and whip in the freezer for about 10 minutes prior to starting. That was easy wasn't it? And now your hands are soft and you have buttermilk for pancakes. People are always amazed when I tell them I make it myself. I suppose it's because they are picturing me milking a cow and churning butter on the porch, not this girl!
Happy Monday! Thanks for sharing this journey with me for 300 posts...here's to 300 more!
What you need:
- Heavy Whipping Cream (use as much or little as you like, I usually do about 2 cups and I don't usually measure it, I just pour in half of the carton)
- Kitchen-aid stand mixer with the whisk attachment. You could do it with a hand held mixer but this way is a lot easier.
- Salt or seasonings to taste. I like a garlic herb blend or even cinnamon.
- A strainer, bowl for the strainer to sit and a mason jar to hold your buttermilk. A dish or container for your butter.
- A loaf of fresh bread. Okay this one isn't required but you'll want it! Try this recipe, its easy!
What you do:
![]() |
| Put your cream in the mixer and turn it on low so it doesn't splash out. |
![]() |
| It will turn into whipped cream, resist the temptation to eat it! It will still be really white in color and fluffy. |
![]() |
| A short while after the butter will separate from the buttermilk and it will be yellow in color. Turn your mixer off. |
![]() |
| This is the buttermilk. Strain it into a bowl and then transfer the milk to a jar. |
![]() |
| Get the butter out of the whip and squeeze out any excess buttermilk. Then wash your butter by running it under cold water and kneading it with your hands for a few minutes. |
![]() |
| Now you can add seasoning and shape it to fit in the dish of your choice. |
The time it takes to go from cream to whipped cream to butter will vary depending on how much cream you use and how cold your mixer bowl, whip and cream are. I'm usually done in 15 minutes, start to finish. To make butter faster, put your mixing bowl and whip in the freezer for about 10 minutes prior to starting. That was easy wasn't it? And now your hands are soft and you have buttermilk for pancakes. People are always amazed when I tell them I make it myself. I suppose it's because they are picturing me milking a cow and churning butter on the porch, not this girl!
Happy Monday! Thanks for sharing this journey with me for 300 posts...here's to 300 more!
Friday, November 2, 2012
Thanksgiving Turkey Family Hands Craft
Last year we made a family turkey hand print. It was such an easy craft to make! I used ROY G. BIV to decide colors so there wouldn't be any squabbles. No more babies in this house, so there won't be indigo or violet! I also wanted to use the same colors each year so that we can see the kids hand size progression. I can't wait to get started on this years! My husband was the exception. He was brown for the base of the turkey and ol Roy doesn't have an appreciation for turkey color. After it dried I drew a face on him, the turkey not my husband, and we put each persons name, color and what they were thankful for on the back. So much fun and I love looking back at how little everyone's hand was and what they were thankful for. In just a few years we are going to have one fat turkey!
Join me over the next three weeks for my yearly Thankful Thursdays in November. I am really grateful for so many people this year and I love the time for reflection.
Friday, September 14, 2012
Football Wreath
It's Friday and in Oklahoma a Fall Friday night means one thing, Football. Tonight is the big Game against Union and while there is no way I'm venturing out anywhere near where the game is (no way I'm messing with that traffic) here is my team spirit, wreath style. Ellie is a cheerleader this year (ugh, I am really trying to embrace it) so we are going to lots of little football games. So I decided to make a fun tiger football wreath with some stuff I already had on hand.
By now you may have figured out that I'mcheap thrifty. I've been using the same twig wreath from Hobby Lobby since last year and I've re-spray painted the letter to match at least 3 times. Why not right? So this $6 wreath, that I got with a coupon too, has served me really well.
By now you may have figured out that I'm
Let's Make It!
I took leftover golden yellow tulle from a game day tutu I made for Regan and wrapped it around the wreath. I made a bow from tulle and wide black satin ribbon. Next I cut 6 inch (approximately) strips of yellow and black ric-rac and tied the pieces on. I attached a stuffed beanie baby tiger I had (from high school) with ribbon. I picked up a stuffed football from the dollar store and hot glued a pipe cleaner to the back to attach it to the wreath. I spray painted my trusty letter J gold and hung it in the middle of the wreath with a gold ribbon. Took me about 10 minutes from start to finish! Happy Friday everyone!
Thursday, September 13, 2012
Easy Peach Cobbler Recipe
When I say easy I mean easy! Seriously you won't believe you made this so quickly and with simple ingredients. So lets get started and forget you're on a diet, I did!
Ingredients:
1 stick or 1/2 cup of Butter
1 1/2 cups All Purpose Flour
2 tsp. Baking Powder
3/4 Cup Sugar
1 cup Milk
1/2 cup of Peach syrup (from one can of peaches)
2 15 oz cans of Peaches in Heavy Syrup
Topping Ingredients:
1/2 cup of AP Flour
1/2 cup of brown sugar
1/2 stick (1/4 cup) of Softened Butter
Dash of cinnamon (optional)
Let's Make It!
Preheat oven to 350 degrees. Melt that big ol' stick-o-butter and pour into 9x13 pan. In large bowl combine flour, baking powder and sugar and stir with a fork. Next add 1 cup of milk, peach syrup (just open the can and drain the syrup into a 1/2 cup) and stir until just combined. Pour batter into pan over butter (it's okay if the butter resists having batter on it and goes to the sides). Lastly add the the 2 cans of peaches, syrup and all, evenly over the batter. Put into the oven for 25 minutes.
While that is baking make your crumble topping. Combine all ingredients until there are little clumps formed but there are no clumps of butter. After the cobbler has been in for 25 minutes sprinkle the crumble on top and bake an additional 15-20 minutes.
Friday, August 24, 2012
Rain Boot Planters
These are my favorite garden accessory other than a Tinkerbell stepping stone that Regan made. I wish I could say I had a flourishing, lush garden, but it's been 110+ here and my garden looks dead and pathetic. I'm one of those people that listens to the voluntary water restrictions that the city issued and as a result my lawn and garden look like Fall came early and there are dead leaves everywhere! Nonetheless I still have these cute little planters. Regan outgrew her Barbie rain boots and since they weren't quite the color for Jack and pretty faded from her leaving them outside they were my pick. It was nice to be able to re-purpose them as well since no one could wear them anymore.
Here's how I made them over. I took the inserts out of the boots and drilled holes in the bottoms so that the water could drain out. Then I spray painted them pink. Not any special kind of spray paint just general outdoor/indoor. It took about 3 good coats of the pink and then I did one coat of clear. Then I filled them up with dirt and some flowers after letting them dry for 24 hours. They looked really cute with live flowers (and of course I didn't get a picture of that!) but that that ship has sailed! They have been out for a good four months and held up beautifully through some thunderstorms and blistering heat. I've seen some cute Pinterest posts with rain boots but my experience with Regan's fading from leaving them outside made me weary of leaving them untouched and I am so glad I painted them, it really made all the difference!
Happy Gardening!
| After their first coat of pink. |
| Here they are after enduring the end of Spring and the long hot Summer! |
Labels:
children,
crafts,
Easy,
garden,
Green Home,
Home Decor,
make it over,
rain boots,
summer,
upcycled
Monday, June 25, 2012
Elmo Birthday Party
This year I whipped out the Elmo cake pan. Ethan and Ellie both had Elmo parties for their second birthday, and I know that Regan will either be grateful or resentful that hers wasn't. I was Elmo'd out at that point. I probably could have done any boy theme and Jack would have loved it. If it moves he likes it! When they are little I keep it really low key and just family. It's easier on me and they don't really know anyways. There were a few things I knew I wanted and I just went from there.
For decorations I wanted things to be simple and easy to clean up. For the birthday banner I printed off flag templates at Martha Stewart and decorated them like Elmo's World with loops, yellow scribbles and blue letters. I let go of my perfection and let Ellie color the yellow background and cut them out. I did the loops at the top and wrote the letters. We tried having her do the loops, but hers ended up crooked and after 3 or 4 tries and we both wanted them straight across so she let me do that part. She was really just looking forward to the cutting part. I used orange curling ribbon to hang it. I went to the pet store and got a plastic (yay for plastic!) round fish bowl, rocks and "Dorothy" for the table. I put a glitter covered "2" in her bowl, just like on Elmo's World. Jack loved Dorothy. It was less than $15 which is pretty cheap for a center piece! I printed out Elmo coloring pages and out those out with a jar full of new crayons. I also had goldfish crackers in a round bowl to snack on. I found an Elmo shirt on clearance at Wal-Mart (I know I caved) for $5 in the junior section and used it on the birthday chair. I had intended to turn it into a pillow but I have been finding it harder to sew lately. I used a red tablecloth, balloons and cups with orange plates as big "Elmo noses".
Since it was also Father's Day we made a lunch out of it with hot dogs and bratwurst. I know I won't be able to combine the celebrations forever so I figure I better do it while I can. Sorry for the poor picture quality, these were not my best!
That's all! Simple, fun and the kids had so much fun making his day special. The big kids had made gifts for him and took such pride in giving. Jack lighted up with his "surprise" face with every gift and each grandparent. Love my not so little family and watching them grow!
This week:
Cozy Coupe Ferrari Tutorial
Summer Fun and the Outdoor Pirate Ship
Things I learned at The Color Run
For decorations I wanted things to be simple and easy to clean up. For the birthday banner I printed off flag templates at Martha Stewart and decorated them like Elmo's World with loops, yellow scribbles and blue letters. I let go of my perfection and let Ellie color the yellow background and cut them out. I did the loops at the top and wrote the letters. We tried having her do the loops, but hers ended up crooked and after 3 or 4 tries and we both wanted them straight across so she let me do that part. She was really just looking forward to the cutting part. I used orange curling ribbon to hang it. I went to the pet store and got a plastic (yay for plastic!) round fish bowl, rocks and "Dorothy" for the table. I put a glitter covered "2" in her bowl, just like on Elmo's World. Jack loved Dorothy. It was less than $15 which is pretty cheap for a center piece! I printed out Elmo coloring pages and out those out with a jar full of new crayons. I also had goldfish crackers in a round bowl to snack on. I found an Elmo shirt on clearance at Wal-Mart (I know I caved) for $5 in the junior section and used it on the birthday chair. I had intended to turn it into a pillow but I have been finding it harder to sew lately. I used a red tablecloth, balloons and cups with orange plates as big "Elmo noses".
Since it was also Father's Day we made a lunch out of it with hot dogs and bratwurst. I know I won't be able to combine the celebrations forever so I figure I better do it while I can. Sorry for the poor picture quality, these were not my best!
| Printables, crayons and goldfish- the kids loved it! |
| I watched A LOT of Elmo's World to get those colors right, LOL! |
| His new Ferrari, here is the tutorial! |
| Fire Ellie! |
| They had to hold him back so he wouldn't blow it out until after the song, he had already blown it out once! |
That's all! Simple, fun and the kids had so much fun making his day special. The big kids had made gifts for him and took such pride in giving. Jack lighted up with his "surprise" face with every gift and each grandparent. Love my not so little family and watching them grow!
This week:
Cozy Coupe Ferrari Tutorial
Summer Fun and the Outdoor Pirate Ship
Things I learned at The Color Run
Labels:
Birthday Ideas,
children,
crafts,
DIY,
Easy,
Elmo,
Elmo's World,
family,
family fun,
fathers day,
Party,
Personal,
Photography,
Playtime
Friday, June 15, 2012
Father's Day Photo Gift
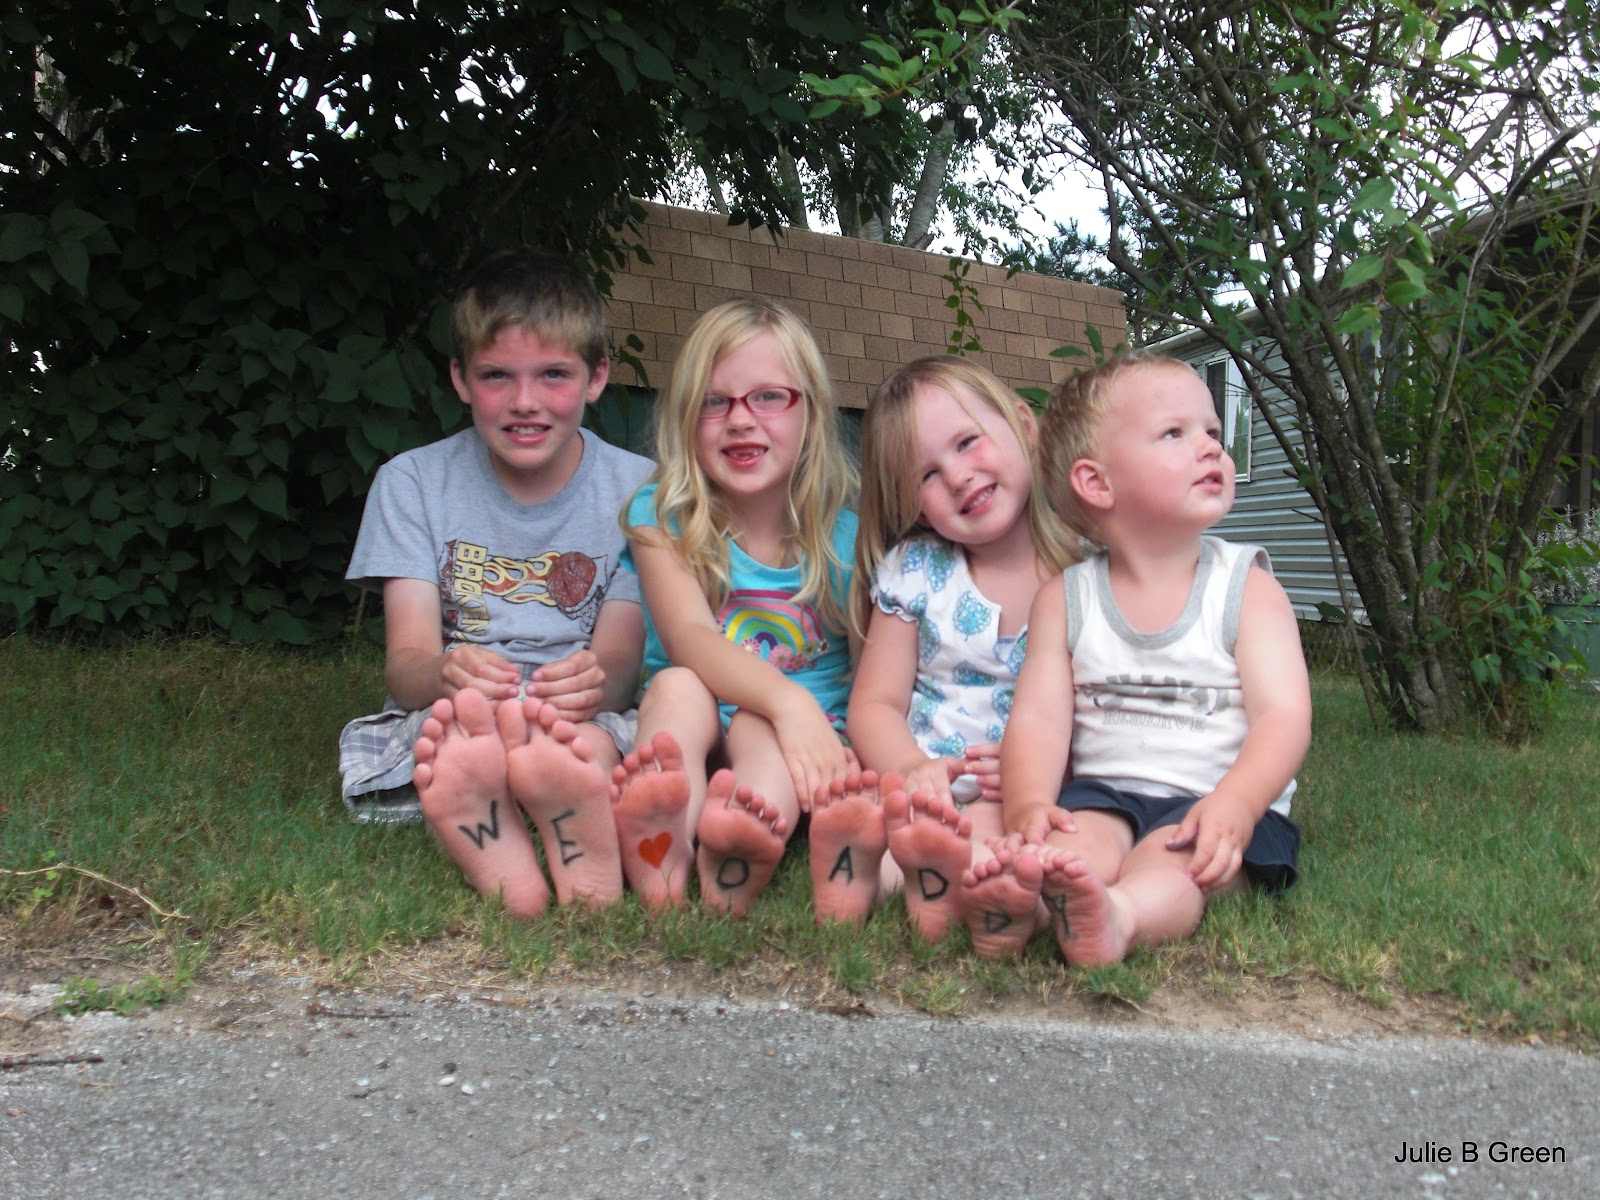
I searched and searched for the original picture that inspired this gift but I could not find it. I could swear that I pinned it! So if it's yours, you are awesome and leave me a comment so I can link to your awesomeness!!! Update: I found it! Go to Freckle PhotoBlog tp see the original! She has some really cute ideas. This really only took me about 10 minutes to complete. I gathered the kids and wrote on their feet, this is the easy part. Snapped some pics as fast as I could, until I thought I had enough to work with. It is a little bit difficult getting 4 kids to sit still, with their feet up and their faces looking at the camera at the same time but definitely not impossible. The shot I used they aren't all looking at the camera but it reflects their personalities the best and their ages (and their feet are up) so that's why I chose it. I think Dale will love it. Print out an 8x10 and frame it! Your cost is about $10!!
| This one was the winner. |
| Not quite. |
| I love the other kids smiles. |
| Feet Jack feet!! |
| Feet, hands, Ahhhh! |
| And we're done. |
Labels:
crafts,
Easy,
fathers day,
Holiday,
Kids,
photo frame,
Photography
Thursday, May 31, 2012
Campfire Cowboy Skillet
You're going to have to do a hike to burn this off but it's really yummy and uses up camp leftovers like nobody's business. I made this for lunch and it was a hit. Especially with the hubs.
What you need:
Leftover bacon and sausage from breakfast (we had about 6 strips of bacon and 3 patties leftover)
1 lb of ground beef
1/2 onion chopped
1 big can of Bush's Original Baked Beans
Approximately 3 tablespoons of Barbecue sauce
Large cast iron skillet
Hungry Campers
What to do:
Cook the ground beef and onion together in a cast iron skillet on a grate over the fire. It helps if you have it not perfectly level so that the grease kind of self drains to one side of the skillet. While the ground beef and onions are cooking cut the bacon and sausage into bite size pieces. Once the beef and onion mixture is cooked drain off or use paper towels to remove as much grease as possible. Add the bacon, sausage, can of beans and barbecue sauce. Let simmer over fire about 5-10 minutes. Serve with crackers, chips, corn bread, anything you have on hand. Enjoy!
Labels:
camping,
cooking,
Dinner,
Easy,
family,
Food for Blog,
recipe,
summer,
What's for Dinner
Tuesday, May 29, 2012
Green Home {make your own fabric softener}
I love how easy and cheap it is to make my own fabric softener. All it takes is 3 ingredients and about 5 minutes. I got the ingredient recipe from My Kitchen Escapades through Pinterest. I loved her ingredients, I just hate measuring! I like to keep it as simple as I can! Especially doing laundry for a family of six.
{What you need}
1 bottle of cheap Suave conditioner-I use Ocean Breeze about $1.60 at Target
Distilled White Vinegar- I it at Sam's Club. 2, 1-gallon jugs for $3.58! You will need about 1/2 gallon.
Hot Water
An empty 150-170oz old liquid detergent or fabric softener container (you're recycling!)
{What you do}
Empty all of the Suave conditioner into the container. Add some hot water (as hot as you can stand it) to start dissolving the conditioner. Alternate adding vinegar and hot water until your container is about half full and then shake vigorously. You will get some bubbles but that's okay. Add the rest of the vinegar until you have added about half a gallon. Shake again and then fill the rest with hot water. Give it another good shake and you are ready to go. If you have a bunch of bubbles leave the cap off overnight and then add more water in the morning until you get to the top.
You've just made your own fabric softener for $2.49! My container does about 200 loads which means I'm only paying a little over $.01 per load. Compare that to the Member's Mark from Sam's at $8.48 and $.04 per load or Downy from Sam's at $11.98 and $.06 per load. The savings is not only in my pocket book, but in my drying time as well. The vinegar aids in line drying and not having crunchy clothesline clothes. I also don't get a film on the lid of my washing machine or the area where you add the softener, so less cleaning!
I promise your clothes will not smell like vinegar and your wallet will be a little heavier! Your clothes will still be soft and will smell clean. You can always add your favorite essential oil if you want a heavier scent. Use it just as you would the store bought stuff and yes you can use it in your HE washer.
You might also like:
Green Home {the clothesline}
Labels:
Chores,
clothesline,
crunchy,
DIY,
Easy,
Green Home,
how to be green,
laundry,
recycled
Tuesday, May 15, 2012
The Best Alfredo Recipe
The recipe from Kevin & Amanda makes a Chicken Alfredo, which is what is pictured in my version (my chicken was cut into strips). However, I've found that I can make just the Alfredo and it's less work and still ridiculously good. So good my husband gives me googly eyes when I make it. So good that my mother called and told me I had ruined her dinner because her jar of Alfredo tasted awful after having mine. I also omit the parsley because I don't particularly care for it and I don't grow it (meaning I just have to go out to the garden for the basil and sometimes that is as far as I want to go, lol). I also reduced the pepper because I'm not a huge fan and I didn't want to hear any complaints from the "it's too spicy" whiners department. So here we go. Beware, this is full calorie deliciousness so check your diet at the door.
What you need:
Enough Pasta of your choice for your Posse (I use a box of penne pasta from Target)
1 scant cup of chicken broth (Scant means a little less than) (I used Emeril's Organic it was delicious)
2 cups of heavy whipping cream
1 cup of grated Parmesan cheese
3 cloves of fresh minced garlic
2 Tbsp cornstarch
1/2 tsp salt
1/4 tsp fresh ground pepper
8 basil leaves, chiffonaded (to chiffonade the the basil roll the leaves together and then make small cuts in the roll from the top of the leaves down to the stems, you will be left with beautiful little strips)
Instructions:
Bring the chicken broth to a boil over a medium heat. While it's heating up mince your garlic. Once the broth has come to a boil, reduce heat to medium and add garlic, cream and cornstarch. Whisk while bringing to a soft boil for one minute. Reduce heat to low and add Parmesan, salt and pepper. Whisk occasionally while allowing your flavors to incorporate and your cheese to melt. While you're waiting cook your pasta. Two minutes before your pasta is done, chiffonade your basil and add to sauce. Drain pasta and return it to pan (no heat). Immediately pour the sauce over the pasta and serve.
Now your table will either be really quiet or filled with gasps and ooohs and aahhhs. Either way you'll be smiling and you probably won't have any leftovers. I paired my Alfredo with a Caesar salad and a homemade Baguette. It's one of my favorite meals and comfort food for sure.
Labels:
Dinner,
Easy,
Food for Blog,
Green Home,
Leftovers,
recipe,
Target,
What's for Dinner
Wednesday, April 25, 2012
How to take a Photo Frame from Drab to Fab in 5 minutes!
This 5 minute DIY has taken me a ridiculous amount of time to finish. Jack will be 2 in June and I'm just now finishing his 1 year old birthday photo frame. I will say that I didn't get the Sheriff badge with his name on it until September of last year when we last went to Silver Dollar City, although I'm pretty sure you could find them online or in a craft or novelty store. So the tutorial.
Take any cheap frame and put your special photo in it.
Hot glue something cute and relevant.
Really that's all it takes.
I got the frame at Wal-Mart (last year before I made that New Year's Resolution to not shop there) for about $2. The cowboy boot was $.69 from Hobby Lobby and I used it here at his birthday party on the high chair. The Sheriff badge was $4.99 at Silver Dollar City. I'm not going to lie I'm having some Wal-Mart withdrawals.
| Drab to Fab in 5 minutes! |
| Just not as cute. Well Jack is :) |
Labels:
Birthday Ideas,
children,
crafts,
DIY,
Easy,
Farm,
Home Decor,
photo frame
Wednesday, April 18, 2012
Easter Fun
Well we ended up having a pretty fun Easter. The kids woke up to Easter baskets and a note from the Easter Bunny. He commented on how pretty our dyed eggs were and told the kids to ask their parents to hide eggs in the backyard for them with the leftover candy that he left for us in the kitchen. I don't even know how he gets away with this stuff, I guess when there is candy involved my kids don't care how it got there.
When the grandparents came over Dale and I hid the eggs in the backyard. Ethan and Ellie got special camouflage and green eggs and were hid in harder places. The little ones were hid on the ground. There were rules like, for the first 10 minutes you can't help each other or tell the other where their egg is if you see it and if you peek while mom and dad are hiding your eggs you have to forfeit your candy to them. I'm way better at hiding eggs than Dale is. Or maybe I'm just meaner!
We got Wendy's for lunch and had a pretty relaxing day. One of the best Easter's we've had. We decorated our eggs with googly eyes and sharpies. I had already blown out our eggs awhile back. Did you know that you can do that? Blow your eggs out and make scrambled eggs, wash the insides out and put them in a carton. Then you are all ready to go when its time to decorate. Blown out eggs can be kept for years! My mom has some that my brother made when he was a kid, 40 years ago!! We watched movies and played outside and ate candy. Easter was fun!
When the grandparents came over Dale and I hid the eggs in the backyard. Ethan and Ellie got special camouflage and green eggs and were hid in harder places. The little ones were hid on the ground. There were rules like, for the first 10 minutes you can't help each other or tell the other where their egg is if you see it and if you peek while mom and dad are hiding your eggs you have to forfeit your candy to them. I'm way better at hiding eggs than Dale is. Or maybe I'm just meaner!
| Game on! |
| Jack was really into it this year! |
| When their 10 minutes was up they started helping each other. And this pic made me realize Ethan has a farmers tan. |
| Candy Break. |
| My Easter dress from 1990. My Grams made it for me. Loved seeing Ellie in it, she is looking so grown up lately. |
| Regan lasted about 5 minutes. Once she had about 6 eggs she went back inside! |
Tuesday, April 3, 2012
Best Fudge Brownies with Chocolate Marshmallow Frosting
If you're on a diet look away, if you can. I could only eat half of one of these because they are so rich and yummy. You can whip these bad boys up in 30 minutes!!
What you need:
Brownie Batter (recipe adapted from All Recipes):
1/2 cup of butter
2 beaten eggs
1 tsp vanilla
1 cup of sugar
Heaping 1/3 cup of cocoa powder
1/2 cup all-purpose flour
1/4 tsp salt
1/4 tsp baking powder
Frosting:
1/4 cup softened butter
4 Tb cocoa powder
1 Tb honey
1 tsp vanilla
Scant 1/2 cup powdered sugar
Heaping 1/2 cup marshmallow creme
Directions:
Brownie Batter:
Preheat oven to 350 degrees. Spray 8x8 pan with cooking spray on bottom only. Melt butter in microwave safe bowl for 30-60 seconds until just melted. Add sugar, vanilla and eggs. Combine dry ingredients in separate bowl and mix lightly with fork or whisk before adding to batter. Combine dry with wet, mix well and spread into pan. Bake for 20-30 minutes. Mine took 21 exactly but my oven tends to bake quickly. Remove when toothpick comes out clean.
Frosting:
After putting your brownies in the oven get started on this delicious frosting. Combine all ingredients in a microwave safe bowl. If it is hard to mix pop it in the microwave for 10seconds to make the marshmallow creme easier to blend. Now the hard part is waiting for those brownies to be done!
Frost the brownies while they are still warm about five minutes after they come out of the oven. You will really want to cut into them, but they will be more delicious and won't burn your mouth if you wait about an hour. Put the kids down for a nap and dive into heaven.
Friday, March 30, 2012
I'm gonna party like its my birthday, because it is!
It's Friday! But even better its my birthday! A lot of people don't make a big deal about their birthday the older they get but I keep making a bigger deal out of it every year. I'm entering the last year of my 20's. If you're in your 30's or whatever don't hate, I'll be there soon enough. I spent my 20's having babies, 4 babies. That means 3 whole years of my 20's were spent pregnant. You're not jealous anymore are you? Pregnant, nursing and fat is how I spent the majority of them. At 29 I am the skinniest I have been in my 20's and I'm going to crush this last year. I lost a lot of weight in the last year and being so close to my goal and close to hitting the big 30 has me more motivated than ever. Bring it 29.
So I bet you're wondering how I'm going to spend my fabulous day, right? Well first I'm dropping the kids off at school and getting my birthday coffee from Starbucks. I'm getting the biggest and most caloric thing I can with a shot of espresso. Then I'm going to Walgreen's to pick up some prescriptions for the littles. Brace yourself for these awesome things: laundry, dishes, mopping the kitchen (its only been 2 days but for real its gross), calling the dentist to set up my x-ray, calling and setting up my hair appt (mama's getting her hair did) and taking a nap with the little ones. I know, pure awesomeness. We're having grilled cheese for dinner outside because its my birthday and that's what and where I want to eat. Remember I'm going to hard core mop the floor so I'll be damned if it gets some crazy amount of dinner on it, just give me a few hours of clean okay kids? I'm making Dale take a walk with me 29 times for my present starting with tonight. I want him to live forever (or just The Notebook style and as long as I do) and secretly I know he will become addicted to it especially if he does it 29 times. I have walking withdrawals from not going yesterday. We are going to sing happy birthday (for the umpteenth time) and eat ice cream and maybe a spoon of Nutella and have extra snuggles and extra stories because its my birthday and I get to spend it with the people I hold most dear in the world.
Perhaps the best present I got this year was from my Mom's surgeon who called her with her pathology report saying they did indeed get all of her cancer. She doesn't have to have anymore surgeries (the next one would have been really, really risky) and no chemo. She is a survivor for the second time in my life. Best present ever because I know it could have just as easily been the hardest birthday I've ever had full of uncertainty and sadness. Best present ever. I'm going to rock 29.
| Ellie in her new glasses, I love her. |
| My favorite swing buddies. |
| My favorite Thunder player, number 10. |
| This guy who happens to be the love of my life. Who told me to hurry up and finish blogging because I only had a little bit of young left in me :) and I should spend it with him! |
Subscribe to:
Posts (Atom)


