Pages

Showing posts with label Green Home. Show all posts

Tuesday, August 25, 2015

5 Minute DIY Mason Jar Make-up Brush Holder

I love my makeup brush holder.  It even made the cut to move into the new house. The sweet little patterned jelly jars are some leftovers from my mason jar chandelier and I believe at one point I got them to make homemade jelly. I still haven't made homemade jelly or jam or preserves. Someday.

I choose an antique white spray paint that I already had, oh my am I cheap.  I sprayed the inside and top first and let it dry.  Then I turned it upside down and did 2 good coats.  After that was dry I did a little touch up spray on the rim just to be safe.  That's it.  Took maybe 5 minutes of actual work, my kind of DIY! I ordered some mirror effect spray paint and I can't wait to use it...I just have to finish the whole moving thing. 


Friday, August 24, 2012

Rain Boot Planters

These are my favorite garden accessory other than a Tinkerbell stepping stone that Regan made.  I wish I could say I had a flourishing, lush garden, but it's been 110+ here and my garden looks dead and pathetic.  I'm one of those people that listens to the voluntary water restrictions that the city issued and as a result my lawn and garden look like Fall came early and there are dead leaves everywhere! Nonetheless I still have these cute little planters.  Regan outgrew her Barbie rain boots and since they weren't quite the color for Jack and pretty faded from her leaving them outside they were my pick.  It was nice to be able to re-purpose them as well since no one could wear them anymore.

Here's how I made them over.  I took the inserts out of the boots and drilled holes in the bottoms so that the water could drain out.  Then I spray painted them pink.  Not any special kind of spray paint just general outdoor/indoor.  It took about 3 good coats of the pink and then I did one coat of clear.  Then I filled them up with dirt and some flowers after letting them dry for 24 hours.  They looked really cute with live flowers (and of course I didn't get a picture of that!) but that that ship has sailed!  They have been out for a good four months and held up beautifully through some thunderstorms and blistering heat.  I've seen some cute Pinterest posts with rain boots but my experience with Regan's fading from leaving them outside made me weary of leaving them untouched and I am so glad I painted them, it really made all the difference!

Happy Gardening!

After their first coat of pink.

Here they are after enduring the end of Spring and the long hot Summer!


Tuesday, June 26, 2012

Cozy Coupe Ferrari

I found an amazing tutorial on Pinterest remaking a Cozy Coupe car a few months ago.  I loved it and immediately thought it would be a great birthday present for Jack.  Molly at Just a little Creativity created the cutest blue and green little tykes car and I was smitten when I found it and even more smitten when I found one on Craigslist for $10.


We happen to be Formula1 fans.  I love Ferrari and Fernando Alonso, the big boys however are Red Bull fans and happen to like Sebastian Vettel and Mark Webber.  So what did I propose to make for my little guy?  That's right, a little red Ferrari.  When we watch the races I make sure to teach the little ones how to say Ferrari or Alonso...more fans for my team!


I followed Molly's directions to take the cozy coupe apart and clean it and tape off the areas I didn't want to spray paint.  I however did not remove the door. Once it was clean and dry I spray painted it red (2 good coats using 2 cans) and then placed my Ferrari stickers on.  I had Dale print off Ferrari logos onto sticker paper.  I would highly recommend buying stickers specifically meant for cars if you want them to be super durable otherwise you may have some stickers come off if you don't use a ton of clear spray paint to coat them, or you have a Regan, or you leave it outside in direct contact with weather.  


The sticker areas have all done really well except for the cut out Ferrari lettering it says something more like Fe  ra  i.  Regan attempted to wash it with soap and a scrubber and of course her brute strength.  The Ferrari logos on the front, back and seat are all going strong and have been through rain, mud, sun and a two and three year old.  Jack could care less about the lettering and really so could I.  He just drives his Ferrari car.   


He was so excited!  My car car!!!!

Later he put his new Elmo in the back part and drove him around.

Who needs to be dressed if you are driving in the house?
I'm sure Alonso won the European Grand Prix last weekend because
Jack was driving his Ferrari too.   

So go rescue a sad looking old Cozy Coupe and make it look really awesome!  I really want to do a fabulous, sparkly pink one for the girls now!

Tuesday, May 29, 2012

Green Home {make your own fabric softener}


I love how easy and cheap it is to make my own fabric softener.  All it takes is 3 ingredients and about 5 minutes. I got the ingredient recipe from My Kitchen Escapades through Pinterest.  I loved her ingredients, I just hate measuring!  I like to keep it as simple as I can!  Especially doing laundry for a family of six.

{What you need}
1 bottle of cheap Suave conditioner-I use Ocean Breeze about $1.60 at Target
Distilled White Vinegar- I it at Sam's Club. 2, 1-gallon jugs for $3.58!  You will need about 1/2 gallon.
Hot Water
An empty 150-170oz old liquid detergent or fabric softener container (you're recycling!)

{What you do}
Empty all of the Suave conditioner into the container.  Add some hot water (as hot as you can stand it) to start dissolving the conditioner.  Alternate adding vinegar and hot water until your container is about half full and then shake vigorously.  You will get some bubbles but that's okay.  Add the rest of the vinegar until you have added about half a gallon.  Shake again and then fill the rest with hot water.  Give it another good shake and you are ready to go.  If you have a bunch of bubbles leave the cap off overnight and then add more water in the morning until you get to the top.

You've just made your own fabric softener for $2.49!  My container does about 200 loads which means I'm only paying a little over $.01 per load.  Compare that to the Member's Mark from Sam's at $8.48 and $.04 per load or Downy from Sam's at $11.98 and $.06 per load.  The savings is not only in my pocket book, but in my drying time as well.  The vinegar aids in line drying and not having crunchy clothesline clothes.  I also don't get a film on the lid of my washing machine or the area where you add the softener, so less cleaning!

I promise your clothes will not smell like vinegar and your wallet will be a little heavier!  Your clothes will still be soft and will smell clean.  You can always add your favorite essential oil if you want a heavier scent.  Use it just as you would the store bought stuff and yes you can use it in your HE washer.


You might also like:

Green Home {the clothesline}


Friday, May 18, 2012

Green Home {the clothesline}

I'm going to start posting the ways we have a Green Home.  I mean this is Julie B Green and I bet you have been wondering what the green part is.  Green not only for the planet but for your wallet as well.  Let's face it these have been economically challenging times for quite a few people. This year I will be saving my family over $720 on our electric bill.  We are on an average monthly plan that is calculated by our total energy use over a 12 month period.  They re-calculate ours every December.  In 2011 our electric bill was $200/month, eeeek!  For 2012 it is only $140.  How did I do this?  Simple, I started to use a clothesline.

At this point you are either intrigued or you think I'm completely nuts.  If you think I'm nuts, well maybe I am, but I'm $720 nuts.  We don't have a traditional clothesline hung on metal poles from the ground and we don't have one of those square turning ones either.  Ours is hung along the top of the posts of our back patio and connected to the house.  I don't line dry everything all the time and I don't have crunchy clothes either, ick!  I also don't spend hours more on laundry.  I timed myself, it takes me 5 minutes to take a load off the line and hang a new one up.  That's it, just 5 minutes.

How did we do it?  Well honestly my husband did it after I asked him nicely.  Look at the pictures and then show your phone to the guy at Lowe's :) and ask your husband nicely to put one up for you.  It only cost us around $25.  If he rolls his eyes or looks at you like you're crazy just tell him I saved $720.  Money talks!  You could also figure out what works best for you.  Do you have two trees, or a tree and a fence, or a fence and something else?  Not everyone has a covered patio but you could create one with just about any space.  Ours is really sturdy and has a lot of tension which I think is key.  I also like that it is shaded most of the time being around the patio, although the sun is great at removing stains so I have one side that is really sunny.  If it starts to rain I'm not out taking clothes off the line in the rain.  I think it took him about 30 minutes to get it up.  He's pretty awesome.

I don't have crunchy stiff clothes for a couple of reasons.  First, I don't let them get all the way dry outside.  I bring them in when they are still a little damp and pop them in the dryer for about 10 minutes.  10 minutes versus an hour + per load is the money saver folks.  Second, I make my own fabric softener which contains vinegar.  There's some science behind it and vinegar is a natural fabric softener.  I'll show you how to make your own later.  It's cheap and it works.  Third, I use wool dryer balls.  I make my own, but you can buy them online.  Etsy would be a good place to look.  I'll show you how to make your own on another post.  That's it.  Just three things.  If I goof and leave stuff out too long I wet two wash clothes and throw them in with the load in the dryer.  They provide enough moisture to take out any crunchiness and wrinkles.

Now for the corny part to all this.  I really like hanging my clothes up.  Not just for the money and environment, but because on those days when things seem never ending I can spend 5 minutes outside in the fresh air.  When Jack was really little I would take him out with me and put him in his bouncy seat or his wrap and it forced me outside and made the insanity of having a newborn and kid number four more bearable in the early days of sleeplessness. There is also something very 1950's house wife about it and to be honest I kind of like that part.  It connects you to the earth and mother earth and nature in a spiritual/hippy way that I can really appreciate too.  I really appreciate that $720, more than the hippy part!


He drilled this hook into the rock/ house.

This contraption was so that he could get the tension correct/adjusted.

He also installed support hooks on the perimeter beams so that the line would have extra support.
While I'm waiting for another "I peed in my bed Mommy" load of laundry to go on the line it's drying cute art work.

Another look at the mechanism that holds it into the wall, and my cute lights.  


Tuesday, May 15, 2012

The Best Alfredo Recipe


For the longest time I thought that I didn't like Alfredo sauce.  I had tried it off my husband's plate every time he ordered it and even tried it from a jar.  I always thought it was just okay and I never thought it was good enough for all the fuss people seemed to make over it.  Then when it was my turn again to take our friends food after the birth of their son so I asked them if they had any requests.  Well the first was for more homemade bread and the second was for Alfredo.  So I did what any good blogger would do and looked for a recipe out in the blog world.  And boy did I find it.  Kevin & Amanda provided me with a fabulous recipe and a new staple in the Jones house.  

The recipe from Kevin & Amanda makes a Chicken Alfredo, which is what is pictured in my version (my chicken was cut into strips).  However, I've found that I can make just the Alfredo and it's less work and still ridiculously good.  So good my husband gives me googly eyes when I make it.  So good that my mother called and told me I had ruined her dinner because her jar of Alfredo tasted awful after having mine.  I also omit the parsley because I don't particularly care for it and I don't grow it (meaning I just have to go out to the garden for the basil and sometimes that is as far as I want to go, lol).  I also reduced the pepper because I'm not a huge fan and I didn't want to hear any complaints from the "it's too spicy" whiners department.  So here we go.  Beware, this is full calorie deliciousness so check your diet at the door.


What you need:

Enough Pasta of your choice for your Posse (I use a box of penne pasta from Target) 
1 scant cup of chicken broth (Scant means a little less than) (I used Emeril's Organic it was delicious)
2 cups of heavy whipping cream
1 cup of grated Parmesan cheese 
3 cloves of fresh minced garlic
2 Tbsp cornstarch
1/2 tsp salt
1/4 tsp fresh ground pepper
8 basil leaves, chiffonaded  (to chiffonade the the basil roll the leaves together and then make small cuts in the roll from the top of the leaves down to the stems, you will be left with beautiful little strips)


Instructions:

Bring the chicken broth to a boil over a medium heat.  While it's heating up mince your garlic.  Once the broth has come to a boil, reduce heat to medium and add garlic, cream and cornstarch.  Whisk while bringing to a soft boil for one minute.  Reduce heat to low and add Parmesan, salt and pepper.  Whisk occasionally while allowing your flavors to incorporate and your cheese to melt.  While you're waiting cook your pasta.  Two minutes before your pasta is done, chiffonade your basil and add to sauce.  Drain pasta and return it to pan (no heat).  Immediately pour the sauce over the pasta and serve.  


Now your table will either be really quiet or filled with gasps and ooohs and aahhhs.  Either way you'll be smiling and you probably won't have any leftovers.  I paired my Alfredo with a Caesar salad and a homemade Baguette.  It's one of my favorite meals and comfort food for sure.   


Thursday, March 8, 2012

Surprise! We're having a ...

Vasectomy!  Everywhere I turn people are pregnant or have newborns.  I'm sure it has always been this way, I'm just aware of it more.  I am not.  We are done.  I am only 28.  I still have the drive to have more kids, my biology is in overdrive.  Thankfully my brain has evolved and I can overcome the drive.

The best thing about being 28 and knowing that you are done having children is knowing that you can be there for all of your friends that aren't finished.  I can enjoy their pregnancies and labor pain free and enjoy their sweet bundles of joy and give them back without the staying up all night and engorged breasts.  I get to focus on me and my body again which has made me a better mom and hotter wife :).

I get to cut the cords, that is I get to do the snip.  I'm more than thrilled!  I've been instructed that I am not allowed to have my phone in there, not by the doc, but by my husband.  Rumor has it wives have taken pictures!!!  I'm still going to have him take my pic with the scissors in hand and I'm going to let out a "muahaha" when I do it.  I wouldn't be myself if I didn't make a joke!

So raise your glasses and give a cheer!  Baby free days are almost here!


On a blog note, I'm hoping to get the Snow White Party posted tomorrow (it was really cute) and I'm working on a "Green Week" for later this month.  Get ready to save some green!  I'm also co-hosting a baby shower this weekend, so I should have some cute baby shower ideas/gifts for you too.  I told you there are babies everywhere!  So excited for my dear friends to have theirs!

Here is a sneak pic pick of Snow White!

Wednesday, March 7, 2012

Spa Day!

The girls and I had a spa day and it was so much fun.  We did facials, hot oil hair treatments, body scrub, a bubble bath, manicures and pedicures.  I wanted the products we used to be all natural and I wanted to make them at home.  That was perhaps the most fun.

First we did a hot oil treatment on our hair. We simply heated up olive oil, brushed it through our hair and wrapped warm towels on our head.  Put your clean towels in the dryer on high for about 5 minutes and while you are waiting for them to heat up brush through your hair to get out any tangles.  Heat the oil in the microwave for 20-40 seconds at a time until warm and check to make sure that its not too hot before putting it on your hair.  It worked really well for me and made my hair a lot softer and smoother.  The girls probably could have done without it, it was a little harder to get it out of their hair, but they had fun doing it!

For facials we mixed organic Greek Brown Cow yogurt, we choose blueberry and added oatmeal to it.  I was skeptical but it worked and my face felt softer and firm.  For the girls it was just fun to put on!

We mixed up a fresh batch of my Brown Sugar Epsom Salt Body Scrub and piled in a big bubble bath.  We giggled, a lot.  Using the Epsom Salt in the bath was so relaxing, even with all of the giggling.  After we got out of the tub we lathered up with lots of lotion, got in our cuddliest pajamas and did our nails while we watched movies.  One of the hardest things with little ones is keeping nail polish from getting everywhere.  My solution is to lay out an old sheet.  The girls know they have to stay on the sheet or we stop.  It helps having a movie on to keep their attention.

I think it is so important to teach my children to pamper and take care of themselves.  Its one of those things as women and mothers that we tend to forget or neglect.  We spend so much time taking care of others that we often forget to take care of ourselves.  It's not only important to me to teach them but to model it as well.  I want them to reflect back and think that I not only took care of them but myself as well.

Just me and the girls, and our handsome camera man!

Silly face form Ellie!

So many giggles!

Tuesday, February 28, 2012

The Upcycled Jean Pillows and a Pocket Pillow Tutorial

So yesterday I showed you my Upcycled Jean Quilt.  I had some extra soft material from the center cut of the blanket that I used for the pillow covers and I embellished with scraps leftover from the jeans and some vintage buttons.  If you are a real quilter please don't take offense to me using the term quilt and to my non-traditional methods.  My Grams was a real quilter and I sometimes wonder if she would just be happy that I'm sewing or if she is rolling over in her grave at my really non-traditional ways of doing things!

These are pocket backs, meaning the back is made to create a pocket for a pre-form pillow to go in.  I did measure these :).  First you need to decide what size pillow you want or have.  These require 3 pieces of material.  Alright we're going to do some math here, prepare your brain if necessary.

Say you want to make a a cover for a 12x12 inch pillow form.  For the front piece you will need to cut a square that is 13x13.  So for any front piece you need to add 1 inch to each side.  Now for the two back pieces.  Divide the longest side in half and add 3 inches (12/2)+3=9  So each side piece will be 13x9.

Here is another example using a rectangle.  You are making a cover for a pillow that is 16x12.  The front piece needs to be 17x13.  The back pieces need to be 11x13.  Got it?  Shoot me an email if you have any questions, math and sewing can be tricky.

Now if you want to add any embellishments you need to do it before you sew the front and back of the cover pieces together.  Trust me its really difficult if you don't.  I made jean "flowers"  by cutting out different size circles and stacking them together.  I sewed them down and then added brown vintage buttons.   For the striped pillow I took strips of denim and sewed them down.  Once washed they did they fray thing.

Once your embellishments are on its time to sew it up.  I got lucky and used the edges of the blanket for the back pieces so that I didn't have to hem them.  If I was making one from scratch I would hem the two back pieces along one of the longer sides, just a half inch hem will do.  If you don't have a serger (I don't) use a zigzag stitch.  Place your right sides together of the front piece and one back piece, pin and sew.  Make sure you back stitch when starting and stopping so you won't get any loose threads later on. Then place the second back piece on, making sure that it goes over the other back piece creating the pocket, pin and sew.  Trim your edges if necessary and clip the corners (careful don't clip your stitch) and turn your pillow cover out.  All done!


No perfect straight lines for me, I love the zigzag effect here.


Monday, February 27, 2012

The Upcycled Jean Quilt

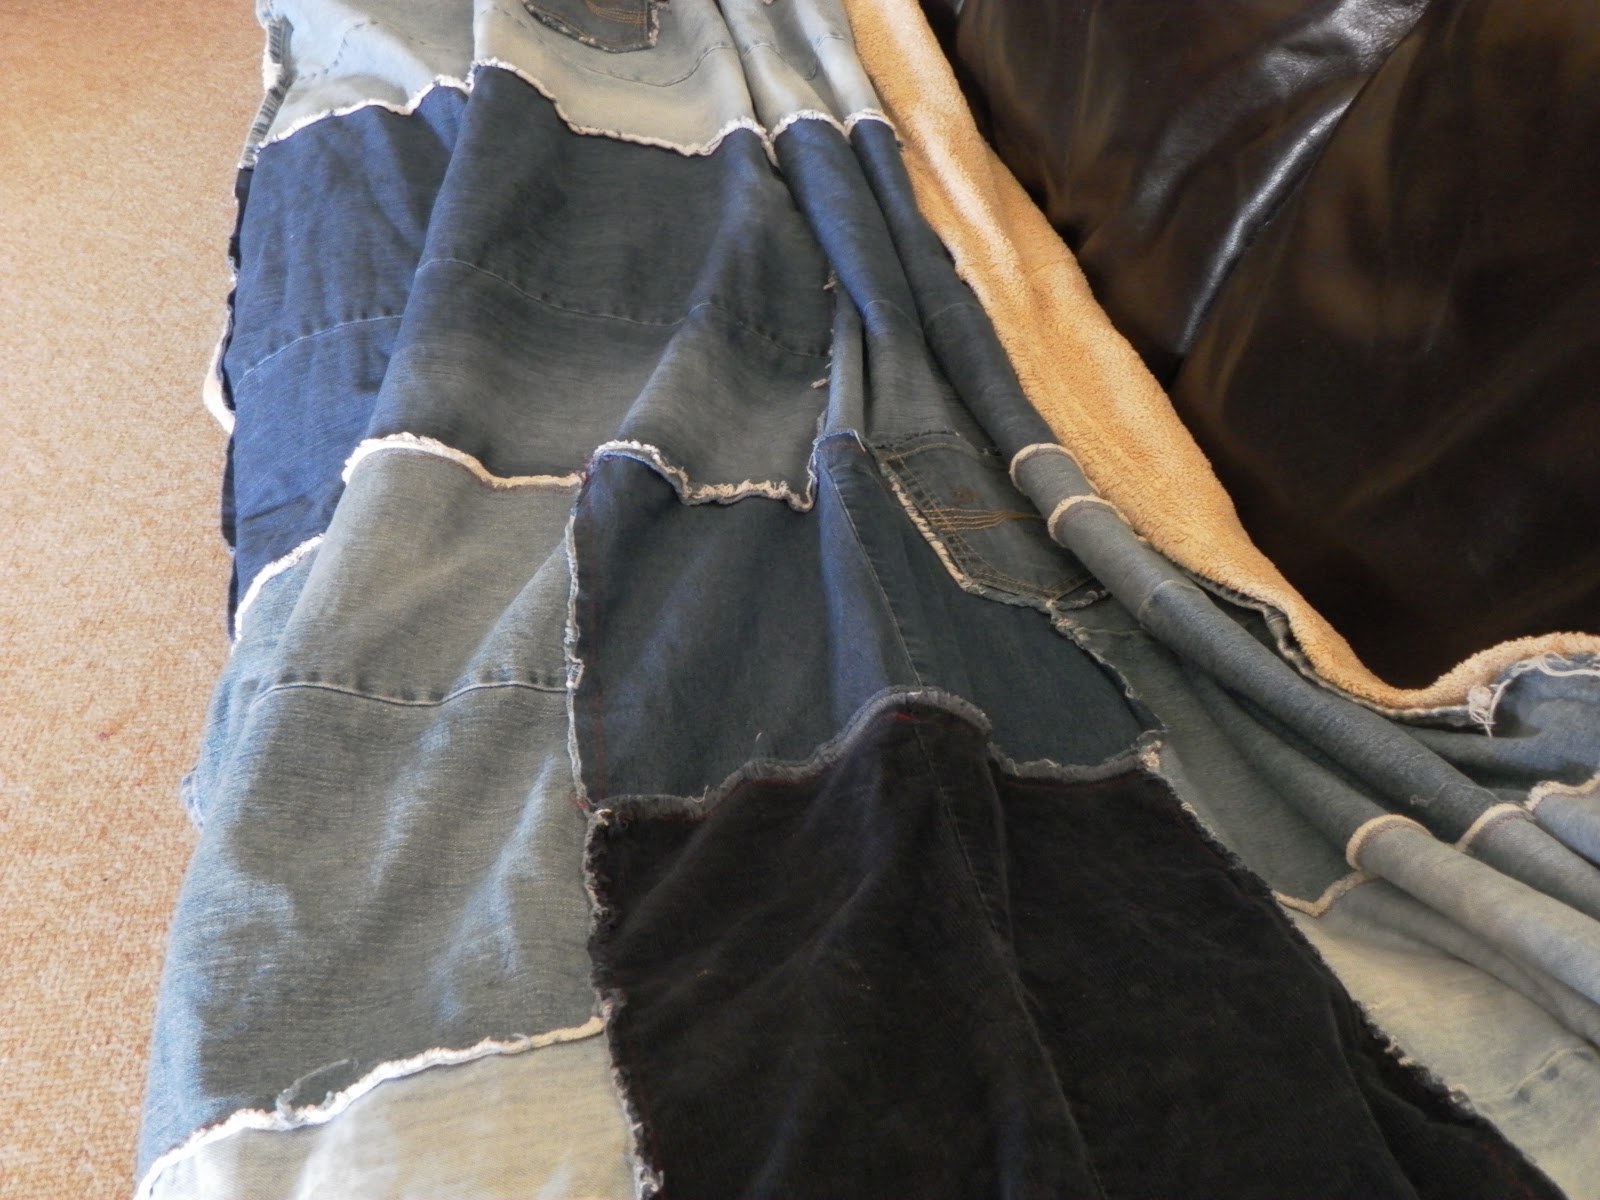
I wanted something that was soft, warm, durable, washable and most important kid friendly.  Extra perks are green (this one was free and saved these jeans from the landfill or the goodwill) and stylish or cool.  I realize that style is personal so if this isn't yours I'm okay with that.  I saved a lot of jeans.  It helps if you drop a few pounds and can use your fat jeans, that means the quilt will double as a good reminder to get your heiney off the couch later.  I also had a big blanket that was still really soft on one side but not so soft on the other.  Sorry I did not take pictures during the process.  Forgive me?  I'll try and be extra clear on directions.

First cut out all your jeans, I used 5 adult pairs and 5 kid pairs.  I left the hems on mine (they will come in to play later) and tried to make them as straight as possible.  Once have all of the big pieces in one pile and the scraps in another decide how big and what shape you want to make.  Mine is a rectangle.  I wanted for us to be able to sit on the couch together and have it cover the length of the couch plus some and be wide enough to snuggle up in, but still go over our toes.  The only thing I used to measure with was my couch.  Because I'm a rogue sewer.

I laid all of my pieces out so that the hems were facing out making the border.  Next I trimmed and pinned.  You can do the next part one of two ways.  You can sew the pieces together with the edges facing out or right side up, which will give a really cool fraying effect that will get softer with each wash or you can sew them where they face down and will be on the inside of the blanket which will be smoother.  The choice is up to you, I wanted the fray!  Once you have sewn all of the pieces together now is the time to add any embellishments that you want.  I added a few pockets for fun.

Now for the backing with that other blanket.  I put the jean quilt top on the floor.  You could have made yours the same size as the blanket to begin with but I didn't.  I was out of jeans!  I made sure that the edges were lined up with the edges of the jean quilt.  I then cut out the middle and re-sewed the blanket up the middle.  This way the finished edges were all on the outside.  With wrong sides together I pinned the blanket bottom and jean quilt top together and sewed along the edges.  Because the edges were already finished it gave it a double layered look and it was a lot less work than a normal blanket or quilt.  Note:  It really helps to do this part during nap time, otherwise people will be driving you crazy helping you.

The verdict?  This is my families favorite blanket.  It is so big that we can all use it and it is so so so warm!  I've been working hard at saving all of my newly too big jeans as well.  It helps to have kids that are growing like weeds as well.  I want to make a more traditional quilt with jean blocks, but that one will probably take much longer to put together.  This one took about 3 hours total cutting, piecing and sewing.  Of course that 3 hours was divided up over about 2 days.

It spans the entire length of the couch- no complaining about not having enough!

Every time I wash it they fray gets better and softer.

Had to add some pockets!

The super soft side.

Here is a closer look at the edge.  

It also gets softer with every wash and its really warm!
I'll show you what I did with my scraps tomorrow.  A jean quilt needs some jean pillows right?