Pages

Showing posts with label Holiday. Show all posts

Wednesday, December 3, 2014

Lego Advent Calendar {and the life lesson it brings}

As a child I celebrated Advent every year with my mother. She had a sweet little set from Unity that we would listen to (on a cassette tape!) and we would light the candles on our wreath. The memory is a dear one and I wanted to recreate that feeling of closeness, reverence and gentility that my mother had with me. I had really considered doing a cute little one that I had to fill myself (ha maybe next year) but when we visited the Lego Store last month in OKC with Girl Scouts I found two Advent Calendars there and opted for easy and fun. Something I knew that would entice them into this celebration. You could make a cute one and fill it with Lego's though and that would be pretty awesome too!

So far, it's love at first open! They had two options in store and I picked both so that the boys and girls can take turns opening one each day. As they opened their first one (littles got to go first) the excitement was palpable. It was then that I realized the main lesson it was teaching them, patience. Patience, something we are not born with but must learn and practice.

It also teaches so many other things. In our case, there was graciousness of the older kids, allowing to let the younger ones go first. It teaches them that they do not always have instant gratification and that its okay when you don't! They will also have to share the sets once they are complete, which isn't anything new when it comes to Lego's, but a good lesson to reinforce nonetheless. I also love that it fosters the anticipation of something and then having to be patient in order to get it. The lessons all tie together and are interwoven. They may not realize what the tradition is teaching them right away, but what they learn from it will spill through in their daily life for the rest of their lives.

You can check out all of the Advent items The Lego Store has to offer here. I could spend all day looking at Lego's, shhhhhh don't tell the kids though!


Wednesday, November 26, 2014

Easy Homemade Cranberry Sauce {Make Tonight in less than 20 minutes!}

I love homemade cranberry sauce. Every year I ponder why I don't make more of it all year long. It's just that good. You can make your own in less than 20 minutes with only 4 ingredients, 5 if you count the water. Yep, that's right. So lets do this!

What you need:

1 bag of cranberries
1 cup of sugar
1 orange
1/2 tsp of Pumpkin Pie spice
1 cup of water

Grater or zester
Stove pot to cook with
Spoon
Strainer
Bowl for underneath strainer
Canning jars or container for storage


What you do:

First you need to zest your entire orange, you should yield about 1 tablespoon of zest. I use a Progressive Grater Pod, I love that thing, took me about a minute to zest the whole orange! But you could use a grater if that's what you got! Once you have your zest, squeeze out the juice from your orange, which should yield about half a cup. If you have a juicer, use it (thanks mom!). Combine all ingredients over a medium high heat for about 10 minutes or until your berries are tender and have burst open. Now is the time to do a taste test. If you want it sweeter, now is the time to add more sugar. I personally like it to have a little tart kick so this is perfect for me. Once the taste is just right, take off of the heat and spoon about 1/3 of the cranberries into the strainer over the bowl. Press down and get all of the juice out. Pour the juice you strained out into the bowl back into the pot, mix and store. This makes enough to fill 3 jelly jars!

Tips, tricks and substitutes:

Roll your orange to release the oil and juices. You will get a lot more by spending 20 seconds rolling your orange between your hand and the counter.

Don't have an orange? Use half a cup of orange juice, or even a spoon of orange juice concentrate!

If you are new to canning, make sure you heat your canning jars under warm/hot water before adding the hot cranberry sauce. Leave about 1/2 inch between the top of the jar and the cranberry sauce. My cans always seal themselves by putting the lid on right away, after cleaning around the top of the jar first.

Straining is optional! If you like a thicker jelly you don't need to strain. Also, if you don't like pieces of cranberry you can strain the whole thing, but that might take 30 minutes instead of 20!

This is a great thing to make with the kids too. They love to watch those berries burst and I've made homemade cranberry sauce lovers out of all of them.


There you have it! Easy, fast and better than the can!


Monday, February 3, 2014

Fun Peacock Inspired Wreath

Making wreaths is strangely fulfilling.  I don't know why, but decorating my front door gives me such satisfaction.  I was hunting down Christmas mark down deals at Hobby Lobby and got everything (except the ribbon which was 50% off) for this wreath in the Christmas Clearance at 80% off!!  I think I maybe spent 5 bucks! Thank goodness for some non-traditional peacock sprigs, green blue and gold!  I think I'm going to try and incorporate that gold letter J in every wreath this year!  Challenge accepted self!


Friday, November 2, 2012

Thanksgiving Turkey Family Hands Craft

Last year we made a family turkey hand print.  It was such an easy craft to make!  I used ROY G. BIV to decide colors so there wouldn't be any squabbles.  No more babies in this house, so there won't be indigo or violet! I also wanted to use the same colors each year so that we can see the kids hand size progression.  I can't wait to get started on this years!  My husband was the exception.  He was brown for the base of the turkey and ol Roy doesn't have an appreciation for turkey color.  After it dried I drew a face on him, the turkey not my husband, and we put each persons name, color and what they were thankful for on the back.  So much fun and I love looking back at how little everyone's hand was and what they were thankful for.  In just a few years we are going to have one fat turkey!


Join me over the next three weeks for my yearly Thankful Thursdays in November.  I am really grateful for so many people this year and I love the time for reflection.

Thursday, November 1, 2012

Halloween 2012-The most original title ever.

Halloween is one of my favorite holidays and it also happens to be Dale and Ellie's birthday so the house is always hopping on October 31st.  This year I am back at work so I bought (gasp, this was really hard for me for some reason) Ethan and Jack's Spiderman costumes.  Although if you can make a homemade Spiderman you are one bad ass Momma!  Regan was going to be a pumpkin and I had plans of making one of those super cute orange tutus that are floating around Pinterest.  However a few weeks ago she did a 180 and wanted demanded to be a ballerina AND she wanted to wear stuff we already had...super bonus.  Regan is the winner.  Ellie wanted to be Barbie originally, until I brought up being a zombie and she was begging to be a "walker".  I watched a lot of YouTube stuff on The Walking Dead make-up, which was pretty awesome and I probably would have watched them all anyways because I'm slightly obsessed with the show.  The fake blood was super fun and I did her make-up in about 10 minutes.  We practiced doing it last week which really helped and if you are going to do makeup I highly suggest doing a practice run.  Oh and it was fun to boot.  I got her dress at Goodwill so that we could tear it up, dirty it up and blood it up and then toss it.

I think I'm going to start taking blog pictures with my phone from now on so excuse the lack of quality.  They go straight to my Picasa Web Album and at this point I'm too lazy to put that memory stick into my computer at home, when I'm there.  And I miss you guys, I miss writing and that web connection to the rest of the world, so from here on out its phone quality okay?  So take a look at my cutie pies.  Oh my how I love them!

This was their stash.

Spiderman plays with Barbie.  Love it.

Jack flexing his muscles.  He does it to the front and not to the sides!

I didn't even have to tell her to put her feet that way!

Oh my how I love that this is what they did when I told them to pose together.

Cheese for Mommy!  Ethan's muscles are adorable.

Mom lets go the candy is out there!

Ellie post blood.  Nevermind the mess in the back.  Yes that is a beer can, I'm pretty sure  you need one before and at least one after taking 4 kids trick or treating.

I used tattoos, fake blood and make-up.

This head wound was my favorite.

We did some claw marks on her back too.


Ellie was the only one that went through the haunted house in our neighborhood.  It was pretty scary.  She got really scared by the zombie at the end, but he was a cool teenager and said "oh we're bro's lets go eat them together!" and she laughed and told him how great his makeup was.  Oh my do I love her and how brave she is, my little Halloween baby!

Friday, June 15, 2012

Father's Day Photo Gift

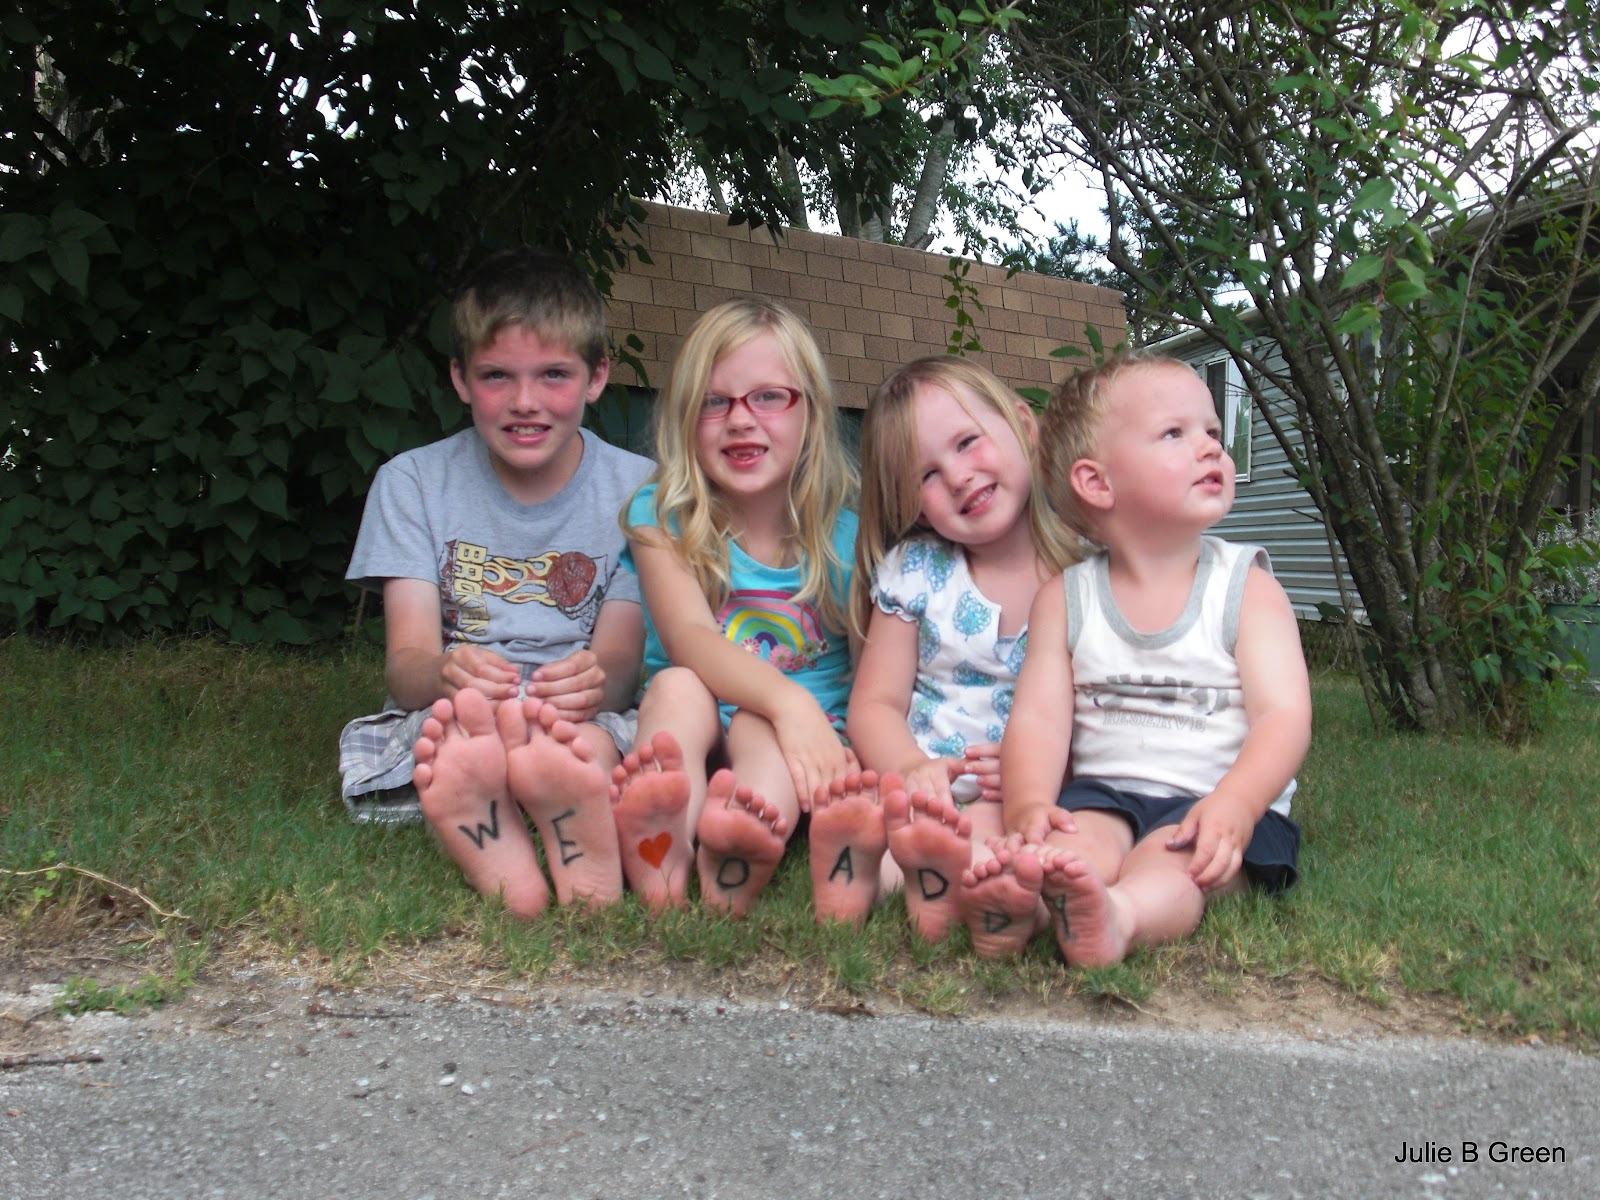
I searched and searched for the original picture that inspired this gift but I could not find it.  I could swear that I pinned it!  So if it's yours, you are awesome and leave me a comment so I can link to your awesomeness!!! Update:  I found it!  Go to Freckle PhotoBlog tp see the original!  She has some really cute ideas.  This really only took me about 10 minutes to complete.  I gathered the kids and wrote on their feet, this is the easy part.  Snapped some pics as fast as I could, until I thought I had enough to work with.  It is a little bit difficult getting 4 kids to sit still, with their feet up and their faces looking at the camera at the same time but definitely not impossible.  The shot I used they aren't all looking at the camera but it reflects their personalities the best and their ages (and their feet are up) so that's why I chose it.  I think Dale will love it.  Print out an 8x10 and frame it!  Your cost is about $10!!

This one was the winner.
Not quite.

I love the other kids smiles.  

Feet Jack feet!!

Feet, hands, Ahhhh!

And we're done.  

Wednesday, April 18, 2012

Easter Fun

Well we ended up having a pretty fun Easter.  The kids woke up to Easter baskets and a note from the Easter Bunny.  He commented on how pretty our dyed eggs were and told the kids to ask their parents to hide eggs in the backyard for them with the leftover candy that he left for us in the kitchen.  I don't even know how he gets away with this stuff, I guess when there is candy involved my kids don't care how it got there.

When the grandparents came over Dale and I hid the eggs in the backyard.  Ethan and Ellie got special camouflage and green eggs and were hid in harder places.  The little ones were hid on the ground.  There were rules like, for the first 10 minutes you can't help each other or tell the other where their egg is if you see it and if you peek while mom and dad are hiding your eggs you have to forfeit your candy to them.  I'm way better at hiding eggs than Dale is.  Or maybe I'm just meaner!

Game on!
Jack was really into it this year!
When their 10 minutes was up they started helping each other.  And this pic made me realize Ethan has a farmers tan.
Candy Break.
My Easter dress from 1990.  My Grams made it for me.  Loved seeing  Ellie in it, she is looking so grown up lately.
Regan lasted about 5 minutes.  Once she had about 6 eggs she went back inside!
We got Wendy's for lunch and had a pretty relaxing day.  One of the best Easter's we've had.  We decorated our eggs with googly eyes and sharpies.  I had already blown out our eggs awhile back.  Did you know that you can do that?  Blow your eggs out and make scrambled eggs, wash the insides out and put them in a carton.  Then you are all ready to go when its time to decorate.  Blown out eggs can be kept for years!  My mom has some that my brother made when he was a kid, 40 years ago!!  We watched movies and played outside and ate candy.  Easter was fun!

Friday, February 17, 2012

Easy Valentine Craft for Kindergartners

So with my last post I felt I was really slacking in the Valentine department but my boring craft was a hit.  Apparently glitter and stickers is the key to any Kindergartner's heart.  So if you find yourself in the position of entertaining 20 5-6 year olds, pull out the glitter and watch their eyes light up!

What you'll need:

Doilies- I found packs of 20 at Target for $1 in their bargain area
Glue Sticks- I was skeptical about the glue sticks working with the glitter, but it did
Glitter- it doesn't really matter what color but I used red, pink and white
Stickers- I got some great ones at Target in their bargain bin with cute little sayings, we also used the kids picture stickers from picture day.

What to do:

Give each kid a doily and their face sticker and have them put it wherever they want.  Have them put any other stickers they want on their doily.  Apply glue to the places they want their glitter.  Have the glitter in a container (plastic cupcake containers work really well) and have them put the doily in glue side down in the glitter, shake and voila!

I was worried that the boys wouldn't like the glitter, but they did in fact they loved it.  I think I've been spending too much time around a certain 8 year old :).

Now go find all this stuff on clearance for your Valentine craft for next year!


Tuesday, February 14, 2012

Valentine Slacker

I have been a serious slacker in the Valentine department this year.  We did a few crafts earlier in the month and that was it.  I didn't decorate my wreath or my house.  I even wrote out Ethan's Valentine cards.  His teacher never sent home a list, so he spelled all of the weird names for me and I wrote them for him while he was at basketball practice.  Kids have some weird names and even stranger spellings.  I did help Ellie make a fab mod podge tissue paper covered box but I didn't even take a picture of it.  

I am the homeroom mom for Ellie's class.  We are doing quite possibly the lamest craft ever.  The kids will put their picture sticker (aka the picture they use if you are a missing kid) on a paper doily and decorate it with glitter.  That's it.  Some other more enthusiastic mother is bringing cookies for them to decorate. I am the stick in the mud that insisted all the other snacks be healthy.  The last thing I want is my kids coming home pumped full of candy and sugar.  

Dale and I already celebrated last weekend by going to the ballet and out to dinner with friends so tonight we're having a normal dinner.  Regan spent yesterday throwing up and I spent it attempting to get caught up on all of the bodily fluid laundry.  My dad visited this last weekend and in the whirlwind of everything that was going on I got all off schedule and now I'm catching up on my routines.  The difference between now and say just a year ago is that I'm not stressed out about getting back on track and getting things clean.  I cannot begin to express my gratitude towards the FlyLady.   

What am I really looking forward to this Valentine's Day?  The clearance section at Hobby Lobby.  I just want some bad ass decorations at 90% off.  Maybe next year I will have the house perfectly decorated and we'll make handmade Valentine's...maybe.


Tuesday, January 3, 2012

Room with a View

If you are like me you spend more time in the kitchen than you'd probably like.  My kitchen window, above my sink, has a view of our fence.  Not exactly what I would like it to be.  So when I change out my wreath I change out my window display to give myself a room with a view.  It makes such a difference to do this little thing just for me.  It also makes doing dishes and shining my sink not such a chore.

The fence, what a view!  Now I only see the things that make me happy!

Epsom salt, red bird and branches.  In the other jar I have coffee beans and a candle.  When the candle melts into the coffee beans it looks really neat.  Also a place to put my jewelry.

Epsom salt on pine cones to look like snow.  Epsom salt in a jar with a candle.  

Same wreath from Christmas, minus the ornaments.

I added Epsom salt snow to the pine cones and the ribbon has snow flakes on it.   Simplicity!


Decorating my house is like pampering myself.  I love a few touches of vintage and making it feel like the season inside, even if sometimes I could go outside in a t-shirt.

Saturday, December 31, 2011

The Lowdown on the FlyLady and how I took Control of my Life in 2011

I sound like a crazy person talking about CHAOS, Flying and Control Journals but, and its a big but, less than a week post Christmas and my house looks like parties and Christmas mayhem never happened.  While some parts of Christmas didn't go as smoothly as I wanted (I was up way too late wrapping presents) most of the celebrations we had were easy and carefree.  Thanksgiving and Ellie's Birthday were hands down the easiest and less stressed holidays/parties I've ever had.  I think that next year, Christmas will be just as easy.  It's all thanks to starting a House and Holiday Journal and working 15 minutes at a time.

If one of your goals for 2012 is to get organized, have a clean house, lose weight, eat healthier, etc, I really suggest looking up FlyLady.  It has truly revolutionized my house and my life.  I am pampering myself, I drink the amount of water I should, my house is never more than 15 minutes from company ready, I can spend more time doing things with my kids, crafting, sewing, I've lost over 32 lbs this year and I'm getting rid of the junk that had once taken over my closets, garage and house.

I have been labeled as a super mom before, I'm really not, I just FLY with FLYLADY.  I resisted having routines for myself for a long time and now that I've given in I couldn't be happier or less stressed.  It has even helped in my marriage.  My husband never complained when coming home to a messy house.  He even told me it wasn't a big deal, we had four kids after all.  But I wanted him to come home to a clean house, I wanted to have a clean house and this has given me the tools to do it.  And you know what?  He actually helps more, the kids help more and we do things together.

So scroll down and have a look at my Journals.  I call them my house and holiday journals.  My house journal is broken up into my Before Bed, Morning and After School Routines.  It also includes my Weekly Home Blessing, which is all of the things that I do each week throughout the week.  Next it has detailed Zone Cleaning, with very detailed things to do for each area of my house.  I schedule in days each week to do a Zone Mission and FlyLady sends out their own Zone Missions.  I also have a list of Kid Dashes.  These are things that my kids can do in 5 minutes or less.  I have them do 1 or so each day.  Once its been 5 minutes we stop.  They know I won't make them do more and they give it their all because I keep my word and stop when its time to stop.  In the front pocket of the binder I keep all of our current bills that are due and in the back pocket I keep important receipts or letters.  This way I always know what is due and when and I never have to search around the house to find it.  I also keep my recipes that I use often and my meal plan and shopping lists towards the back of the binder.

My holiday journal serves for any holiday, birthday party or get together.  It's one place where I can put event details, shopping lists, decoration ideas and anything else related.  Once the event is over (like Christmas) I type up what worked, what didn't and what we liked about it or other fun details.  I also include any recipes that we used and want to use again.  For example, we used a new gingerbread recipe and I have it included with the Christmas details.  Next year I can see what worked and have all of those details ready for me.  I file them in chronological order placing each current event in the front and then when its over placing it in the back using clear sheet protectors.  I use the front and back pockets for gift receipts and party item purchase receipts.  I put some Michael's and Hobby Lobby receipts from my daughter's Christmas party at school, so glad I did because I have about $15 in supplies that we didn't use and now I have the receipts handy so I can make those returns.  In the past I would have just kept the items if I couldn't find the receipt with the excuse that I could surely use that craft item.  All that did was add to the clutter that was taking over my life, well not anymore!

My husband rolled his eyes when I started this.   Now he helps me shine my sink!


Yes its NYE and I have already done this! I didn't want to forget anything!

I know you're ready to FLY with me!  Take it on in 2012.  It all starts with BabySteps.  I don't follow what she says exactly, I have tailored it to fit me and my schedule and my life.  It really works!!!  Want help starting?  Comment below I would love to help you!

Friday, December 23, 2011

DIY: Make Your Own Christmas Stockings

In keeping green (both environmentally and monetarily, I mean this is JulieBGreen right?) I made my families Christmas Stockings from a set of old curtains I had made for our last house.  They were a chocolate brown corduroy and since I had made them especially for that house they were just taking up closet space.  I used McCall's pattern M4990.  You certainly don't have to have a pattern though, if you have old stockings use them as a pattern!  I picked this pattern up a few years ago for really cheap and it is one of my favorites.  I made different stockings for the kids and bigger ones for Dale and I.  It pays to be an adult!  For embellishments I used old and broken jewelry and ribbon.  The kids love their stockings and I love that they were basically free.  I also love the contrast of the sparkly jewelry and the durability of the corduroy, making it gender friendly.  Either that or boys just really don't care what is on their stocking, just what's in it!

For the kids stockings I made the pattern which has an overlap, which can be tricky if you aren't a "sewer" but for the adults I used the top of the fabric that had already been sewn down for a curtain rod, thus eliminating that step.  The adult ones were so easy.  I made both adult ones (the ones with ribbon) in less than an hour, including cut time.  Don't forget to add the loop to hang it with.  I almost forgot on the adult ones and caught myself just in time!  If you are embellishing with ribbon make sure that you put the ribbon on before you sew the two sides together.

I haven't decided what to do on the top of the stocking holders yet, maybe little frames with everyone's picture in them?  I want something cool and hip and totally awesome.  That probably won't happen until next year, or after Christmas when all the stuff goes on sale ;).


How to make a new stocking using an old one:


Get a large piece of paper, any will do and place your old stocking on top.  Trace around the old stocking making sure to leave about 1/2 inch for seam allowance.  Next cut a strip of fabric for your loop, 8 inches by 2 inches, or however long you want yours to be.  Sew it closed making sure to tuck the raw edges inside.  Sew on any embellishments to your stocking now.  Place the wrong sides together and pin the end of each end of the loop onto the inside of each side of the stocking.  Sew each loop side on and then pin the stocking together with wrong sides facing out.  Make sure that the top is even when you start to sew or your stocking will look wonky.  Stitch along the edge and make sure that the top on the other side is even as well.   Trim along your seam.  Turn out and admire your work.


I hate the lighting in my living room.  It is absolutely horrible for getting a natural light shot of anything and I just don't have the time to fiddle in Picnik to get them the way I want them.  Oh well.  I hope you all have a very Merry Christmas and if you're celebrating Hanukkah, Happy Hanukkah!  I'll see you all next week after the crazy dies down.


Thursday, December 22, 2011

DIY: Wall Letters

This year I made two wall letters for friends.  They asked others to choose and decorate a letter for their children for Christmas.  How cool is that?  So I worked on an "O" and an "&." I know an ampersand isn't a letter but it does join Y and Z right?

For the O I wrapped yarn around it and cut out our state from a felted sweater.  I hot glued two pieces of the sweater to a cut out cereal box.  Then glued on a heart to the Oklahoma.  I love this one!


The ampersand sat and stared at me for awhile before I saw some episode of Martha Stewart where they were using glitter and a little light bulb went off in my head.  So off I went and started glittering away.  I used red glitter for the top and black glitter for the sides.  I wish I had spray painted it red first, but that was an afterthought unfortunately!


I'm hoping to finish up our stockings this evening.  Somehow I've managed to get sick and I feel like I'm just barely keeping my head above water!  If Jack wasn't asleep in my bed I'd be sewing right now!  I should probably stay away from Pinterest and do some picking up, but I can pick up anytime right?

Tuesday, December 20, 2011

DIY: Easy Christmas Wreath

I've kind of finally got myself together, I'll post more on that next week because it's awesome and I want everyone to feel the piece of mind that I do, and I've actually got a wreath on my door, for the first time ever.  I have to say that I personally love it.  It makes me so happy to have a greeting for anyone who comes over.  I made this one so that everything can be easily removed and I can reuse the wreath.  Everything I used I already had on hand but you could make this for under $15 including the wreath.  I'm cheap like that!

The wreath is a basic wood one from Hobby Lobby (I used a 40% off coupon so it was around $4).  I had two packages of no break bulbs that I had got from Wal-mart on clearance last year, they only started out $1 each so I'm guessing I picked them up for $.50 each.  I also had clearance ribbon that started out $4.  I glued together the two pine cones (from my backyard) and glued the love birds to them (maybe $3 or $4 full price at Hobby Lobby.)

I wrapped the ribbon around it and used craft wire to attach the bulbs and pine cones.  Simple but pretty.  The pine cones and birds are also used in my kitchen window which kind of ties the house together.  It took me about 20 minutes to assemble.  Also I put the wreath on the door holder and hung it from the back of a kitchen chair.  Then I just sat in the floor with my "helpers" and attached everything.  It made it easy to access the back when I pushed the craft wire through.  So go and whip up a wreath!


Friday, December 2, 2011

The Christmas Tree

Last year we started a tradition of going to the tree farm to get our tree.  This year we went on Thanksgiving Eve and it was perfect.  There weren't very many people there and the kids had so much fun jumping on haystacks, climbing on the train, drinking cider and playing with the dog.   Jack flirted with all the ladies in the ornament shop and smiled his way to about 5 candy canes.  I love this tradition and the cool thing is that each year it gets a little bit easier as the kids get bigger.  Last year our tree died but this year it is going strong.  The ornaments on the other hand, don't stand a chance against Jack.  Its decorated rather top heavy, as in 90% of the ornaments are on the top third of the tree.  I love it anyways!  Why I didn't take a picture of the actual tree we got I don't know but we had so much fun.