I choose an antique white spray paint that I already had, oh my am I cheap. I sprayed the inside and top first and let it dry. Then I turned it upside down and did 2 good coats. After that was dry I did a little touch up spray on the rim just to be safe. That's it. Took maybe 5 minutes of actual work, my kind of DIY! I ordered some mirror effect spray paint and I can't wait to use it...I just have to finish the whole moving thing.
Showing posts with label upcycled. Show all posts
Tuesday, August 25, 2015
5 Minute DIY Mason Jar Make-up Brush Holder
I love my makeup brush holder. It even made the cut to move into the new house. The sweet little patterned jelly jars are some leftovers from my mason jar chandelier and I believe at one point I got them to make homemade jelly. I still haven't made homemade jelly or jam or preserves. Someday.
Sunday, August 31, 2014
Lacy Burlap Fall Wreath
I really think that making wreaths is one of the most satisfying crafts ever. When you finish it you put it on your door and present your masterpiece. Perhaps that's a bit dramatic but I always feel accomplished putting up a great wreath. I have been using this same twig wreath for forever. I've definitely gotten my 7 bucks worth. I reused my sparkle corn cobs, feathers, leaves and beaded twigs from last year. I added some lacy burlap wire ribbon, my gold J and some gold pine cones, which I found in the Christmas section. Took about 10 minutes and I think it looks pretty fabulous.
Friday, August 24, 2012
Rain Boot Planters
These are my favorite garden accessory other than a Tinkerbell stepping stone that Regan made. I wish I could say I had a flourishing, lush garden, but it's been 110+ here and my garden looks dead and pathetic. I'm one of those people that listens to the voluntary water restrictions that the city issued and as a result my lawn and garden look like Fall came early and there are dead leaves everywhere! Nonetheless I still have these cute little planters. Regan outgrew her Barbie rain boots and since they weren't quite the color for Jack and pretty faded from her leaving them outside they were my pick. It was nice to be able to re-purpose them as well since no one could wear them anymore.
Here's how I made them over. I took the inserts out of the boots and drilled holes in the bottoms so that the water could drain out. Then I spray painted them pink. Not any special kind of spray paint just general outdoor/indoor. It took about 3 good coats of the pink and then I did one coat of clear. Then I filled them up with dirt and some flowers after letting them dry for 24 hours. They looked really cute with live flowers (and of course I didn't get a picture of that!) but that that ship has sailed! They have been out for a good four months and held up beautifully through some thunderstorms and blistering heat. I've seen some cute Pinterest posts with rain boots but my experience with Regan's fading from leaving them outside made me weary of leaving them untouched and I am so glad I painted them, it really made all the difference!
Happy Gardening!
Here's how I made them over. I took the inserts out of the boots and drilled holes in the bottoms so that the water could drain out. Then I spray painted them pink. Not any special kind of spray paint just general outdoor/indoor. It took about 3 good coats of the pink and then I did one coat of clear. Then I filled them up with dirt and some flowers after letting them dry for 24 hours. They looked really cute with live flowers (and of course I didn't get a picture of that!) but that that ship has sailed! They have been out for a good four months and held up beautifully through some thunderstorms and blistering heat. I've seen some cute Pinterest posts with rain boots but my experience with Regan's fading from leaving them outside made me weary of leaving them untouched and I am so glad I painted them, it really made all the difference!
Happy Gardening!
| After their first coat of pink. |
| Here they are after enduring the end of Spring and the long hot Summer! |
Labels:
children,
crafts,
Easy,
garden,
Green Home,
Home Decor,
make it over,
rain boots,
summer,
upcycled
Thursday, July 19, 2012
Something had to give
Whoa! Where did I go? Sunday night I told Dale we were getting up and doing P90X together and that he needed to be up at 5am. We saw, we did, we spent the morning together working out and having breakfast together before he went off to work and the kids got up. It was great! Since then Jack has caught on to us having fun together in the morning and has attempted to put a stop to it. Tuesday he woke up early and watched us while eating some fruit, no big deal. Wednesday night he decided to get up before we even went to bed and then got up later in the night to come to bed. Dale didn't get his work out in, he didn't get home until 10pm from a work conference. We were exhausted last night but determined to get up and do Yoga at 5am. I woke up at 4am to Jack snuggling me and after putting him back in bed he got up 15 minutes later and went to Dale's side, who put him back down. 4:45 and it's not only Jack but Ellie up as well. She was complaining of her toe itching so much she couldn't sleep. Dale caved and put Jack in the middle of us. I put cream on Ellie's toe and re-set my alarm to 5:30. Let me tell you at 5:30 I said to hell with it, Yoga can happen during nap time. Right now I am balancing working out, really playing and engaging my kids and keeping the house clean but throwing the blog in throws me for a loop. Something had to give and it was my blog. I'm still figuring out the balance of working out, keeping my house clean and my kids engaged and blogging. I will never be one of those blogs that you wonder how she does it all, because I will be the first to admit that I don't do it all. I remember reading a few weeks ago a blog about unplugging and how your kids will remember you. It hit home. I don't want to spend my days glued to the computer and just plop them in front of the TV. I refuse to be that mom. So if I seem absent just know that I'm either working out (for real P90X'ing it), playing with my kids or running around frantically to clean up after them :).
In the next two weeks I'll be posting about: Upcycled rain boot planters, backyard bliss and a the tree house, P90X, our toy and bed room makeovers and our family vacation. So while I'll still be here it may not be as hard core as I've been before.
Monday, March 12, 2012
Snow White Birthday Party, Regan turns 3!
I love this little girl. When asked how old she is her reply is "28." Which fits her personality. She had flip flopped on what party theme she wanted but this was the main request so that's what we did. I love celebrating with my family and friends. Regan gave quite a birthday girl performance smiling and posing for the camera, what can I say she takes after her mother.
I made the cutest little apple cupcakes. While they were a bit more time consuming than say frosting a cake, they were totally worth it and easy too. I found the idea on Pinterest and a cute little blog Design Dazzle. Seriously the best ideas. The day before her party was Dr. Seuss's Birthday and a local bakery happened to be giving away free cupcakes to kids that told them what their favorite Seuss book was. So I picked up some cake doughnuts to make the apple cupcakes with and birthday breakfast, making it easier on myself for the next day.
Apple Cupcake How To:
You will need: Red cupcake liners, cake mix, red frosting, red sugar, regular tootsie rolls, green fruit tootsie rolls and doughnuts (you need 1/2 doughnut per cupcake). You will also need a cutting board, scissors and a toothpick.
Bake your cupcakes and once cool slice the top off. Attempt to not eat all of the cupcake tops. While they are baking you can cut your doughnuts in half, like how you would cut a bagel, mix your red frosting. When cooled and cut dab a bit of frosting on the cupcake to hold the doughnut half. Frost the doughnut and then cover with red sugar. Once they are all frosted and sugared its time to make your stems and leaves. For the stems take a pair of scissors and cut a piece of the tootsie roll off, lengthwise. You can bend it, twist it, roll it to get a stem look. For the leaves you will want to roll out the tootsie roll and then cut out a leaf shape. Use a toothpick to make patterns on the leaf.
The Decor:
I decorated our wreath with tulle and a spray painted "R" tied on with red satin ribbon. I made a bunting from scrap vintage red and blue fabric and vintage yellow bias tape, I love being able to use up fabric scraps and upcycle something. I hung red, blue and yellow balloons from the ceiling using push pins and clear string. We decorated the table with a plastic blue tablecloth and red ribbon. I also did the birthday chair with the excess tablecloth and larger ribbon (I just hot glued that ribbon on to make it stay up!) I got some dirt and sticks from outside and hot glued some little birds on the "branches." That along with her Snow White doll and a stuffed deer we already had were the table decoration.
Snow White couldn't walk around in just anything so I made her a yellow tutu and embellished it with a red satin bow. I dyed one of her shirts blue and sewed some tulle onto the arms, another way to upcycle and use something we already had. I also make her a red head band to complete the look. I used the same ribbon for her tutu and head band on the table, chair and wreath. The tutu was so easy to make, it was my second one ever! I'll be giving a tutorial later this week!
It wasn't the fanciest or poshest party but it was perfect for our family and for my sweet and feisty Regan.
I made the cutest little apple cupcakes. While they were a bit more time consuming than say frosting a cake, they were totally worth it and easy too. I found the idea on Pinterest and a cute little blog Design Dazzle. Seriously the best ideas. The day before her party was Dr. Seuss's Birthday and a local bakery happened to be giving away free cupcakes to kids that told them what their favorite Seuss book was. So I picked up some cake doughnuts to make the apple cupcakes with and birthday breakfast, making it easier on myself for the next day.
Apple Cupcake How To:
You will need: Red cupcake liners, cake mix, red frosting, red sugar, regular tootsie rolls, green fruit tootsie rolls and doughnuts (you need 1/2 doughnut per cupcake). You will also need a cutting board, scissors and a toothpick.
Bake your cupcakes and once cool slice the top off. Attempt to not eat all of the cupcake tops. While they are baking you can cut your doughnuts in half, like how you would cut a bagel, mix your red frosting. When cooled and cut dab a bit of frosting on the cupcake to hold the doughnut half. Frost the doughnut and then cover with red sugar. Once they are all frosted and sugared its time to make your stems and leaves. For the stems take a pair of scissors and cut a piece of the tootsie roll off, lengthwise. You can bend it, twist it, roll it to get a stem look. For the leaves you will want to roll out the tootsie roll and then cut out a leaf shape. Use a toothpick to make patterns on the leaf.
The Decor:
I decorated our wreath with tulle and a spray painted "R" tied on with red satin ribbon. I made a bunting from scrap vintage red and blue fabric and vintage yellow bias tape, I love being able to use up fabric scraps and upcycle something. I hung red, blue and yellow balloons from the ceiling using push pins and clear string. We decorated the table with a plastic blue tablecloth and red ribbon. I also did the birthday chair with the excess tablecloth and larger ribbon (I just hot glued that ribbon on to make it stay up!) I got some dirt and sticks from outside and hot glued some little birds on the "branches." That along with her Snow White doll and a stuffed deer we already had were the table decoration.
Snow White couldn't walk around in just anything so I made her a yellow tutu and embellished it with a red satin bow. I dyed one of her shirts blue and sewed some tulle onto the arms, another way to upcycle and use something we already had. I also make her a red head band to complete the look. I used the same ribbon for her tutu and head band on the table, chair and wreath. The tutu was so easy to make, it was my second one ever! I'll be giving a tutorial later this week!
It wasn't the fanciest or poshest party but it was perfect for our family and for my sweet and feisty Regan.
| The back view, I love this tutu! |
| The Apple Cupcakes! |
| The decor. |
| The wreath. |
| Such a happy girl! |
Tuesday, February 28, 2012
The Upcycled Jean Pillows and a Pocket Pillow Tutorial
So yesterday I showed you my Upcycled Jean Quilt. I had some extra soft material from the center cut of the blanket that I used for the pillow covers and I embellished with scraps leftover from the jeans and some vintage buttons. If you are a real quilter please don't take offense to me using the term quilt and to my non-traditional methods. My Grams was a real quilter and I sometimes wonder if she would just be happy that I'm sewing or if she is rolling over in her grave at my really non-traditional ways of doing things!
These are pocket backs, meaning the back is made to create a pocket for a pre-form pillow to go in. I did measure these :). First you need to decide what size pillow you want or have. These require 3 pieces of material. Alright we're going to do some math here, prepare your brain if necessary.
Say you want to make a a cover for a 12x12 inch pillow form. For the front piece you will need to cut a square that is 13x13. So for any front piece you need to add 1 inch to each side. Now for the two back pieces. Divide the longest side in half and add 3 inches (12/2)+3=9 So each side piece will be 13x9.
Here is another example using a rectangle. You are making a cover for a pillow that is 16x12. The front piece needs to be 17x13. The back pieces need to be 11x13. Got it? Shoot me an email if you have any questions, math and sewing can be tricky.
Now if you want to add any embellishments you need to do it before you sew the front and back of the cover pieces together. Trust me its really difficult if you don't. I made jean "flowers" by cutting out different size circles and stacking them together. I sewed them down and then added brown vintage buttons. For the striped pillow I took strips of denim and sewed them down. Once washed they did they fray thing.
Once your embellishments are on its time to sew it up. I got lucky and used the edges of the blanket for the back pieces so that I didn't have to hem them. If I was making one from scratch I would hem the two back pieces along one of the longer sides, just a half inch hem will do. If you don't have a serger (I don't) use a zigzag stitch. Place your right sides together of the front piece and one back piece, pin and sew. Make sure you back stitch when starting and stopping so you won't get any loose threads later on. Then place the second back piece on, making sure that it goes over the other back piece creating the pocket, pin and sew. Trim your edges if necessary and clip the corners (careful don't clip your stitch) and turn your pillow cover out. All done!
These are pocket backs, meaning the back is made to create a pocket for a pre-form pillow to go in. I did measure these :). First you need to decide what size pillow you want or have. These require 3 pieces of material. Alright we're going to do some math here, prepare your brain if necessary.
Say you want to make a a cover for a 12x12 inch pillow form. For the front piece you will need to cut a square that is 13x13. So for any front piece you need to add 1 inch to each side. Now for the two back pieces. Divide the longest side in half and add 3 inches (12/2)+3=9 So each side piece will be 13x9.
Here is another example using a rectangle. You are making a cover for a pillow that is 16x12. The front piece needs to be 17x13. The back pieces need to be 11x13. Got it? Shoot me an email if you have any questions, math and sewing can be tricky.
Now if you want to add any embellishments you need to do it before you sew the front and back of the cover pieces together. Trust me its really difficult if you don't. I made jean "flowers" by cutting out different size circles and stacking them together. I sewed them down and then added brown vintage buttons. For the striped pillow I took strips of denim and sewed them down. Once washed they did they fray thing.
Once your embellishments are on its time to sew it up. I got lucky and used the edges of the blanket for the back pieces so that I didn't have to hem them. If I was making one from scratch I would hem the two back pieces along one of the longer sides, just a half inch hem will do. If you don't have a serger (I don't) use a zigzag stitch. Place your right sides together of the front piece and one back piece, pin and sew. Make sure you back stitch when starting and stopping so you won't get any loose threads later on. Then place the second back piece on, making sure that it goes over the other back piece creating the pocket, pin and sew. Trim your edges if necessary and clip the corners (careful don't clip your stitch) and turn your pillow cover out. All done!
| No perfect straight lines for me, I love the zigzag effect here. |
Monday, February 27, 2012
The Upcycled Jean Quilt
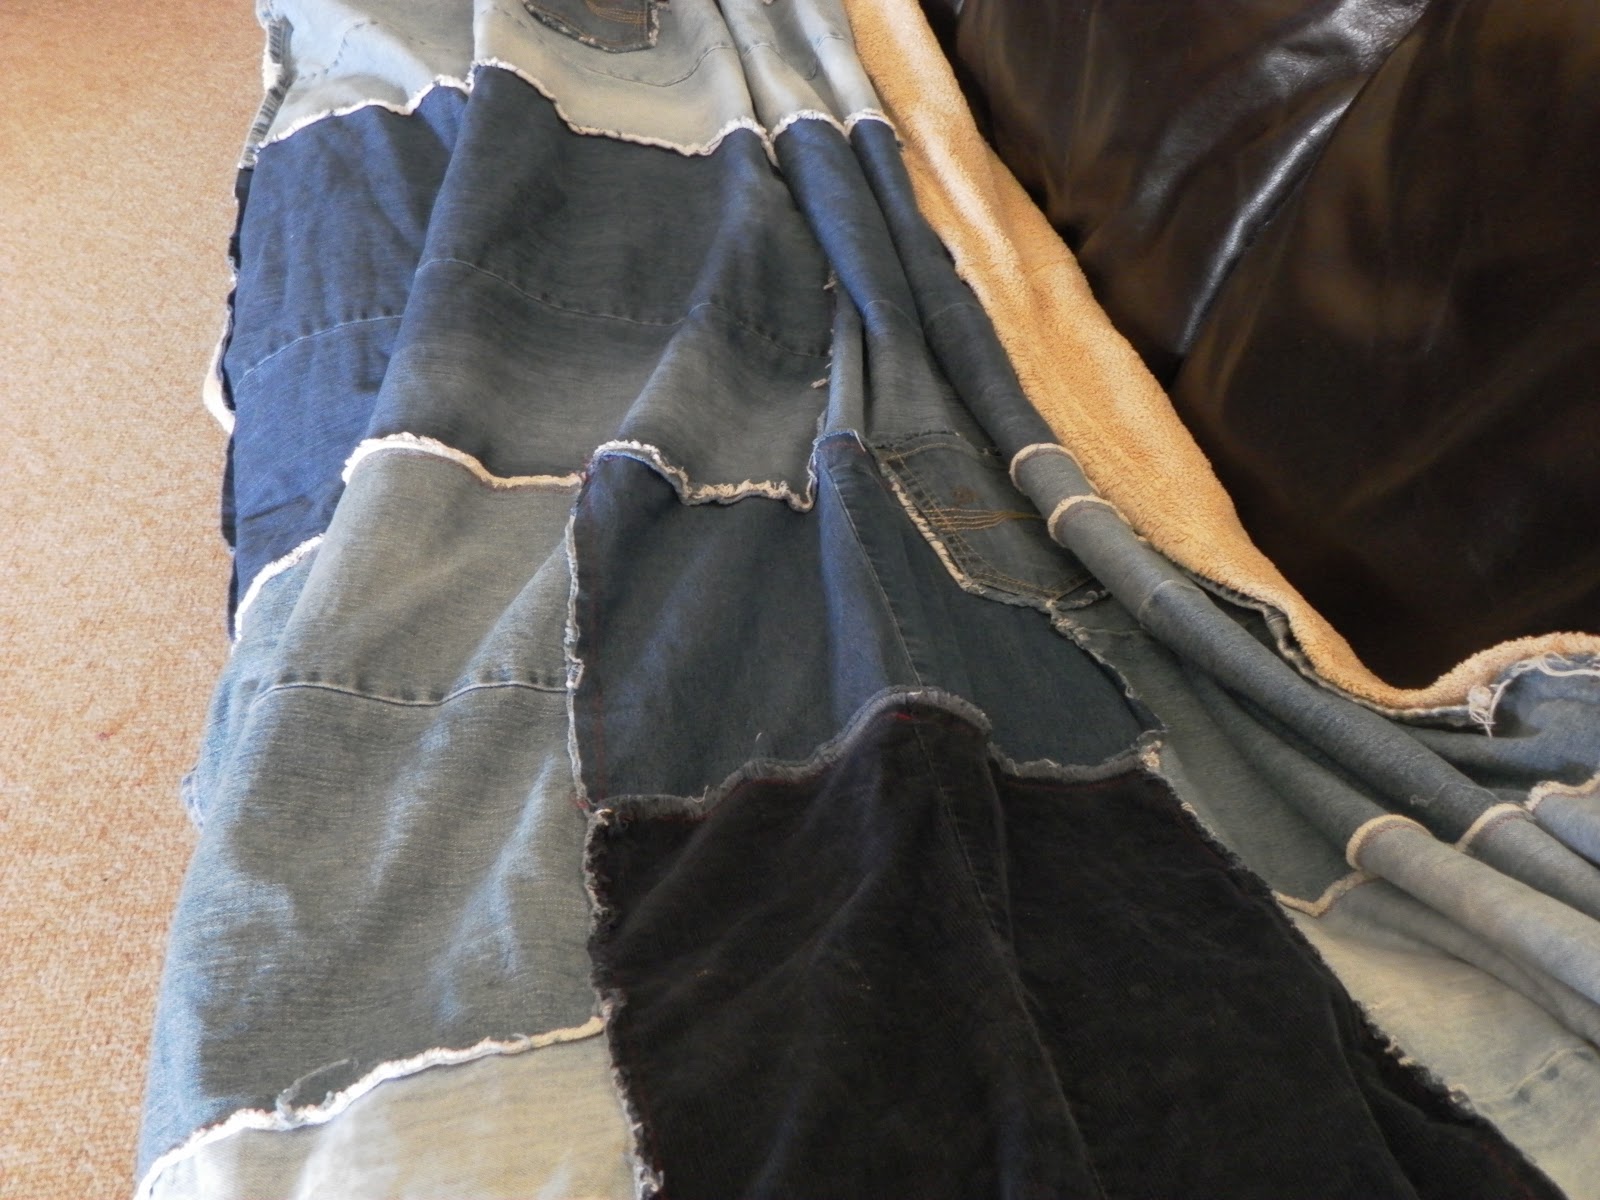
I wanted something that was soft, warm, durable, washable and most important kid friendly. Extra perks are green (this one was free and saved these jeans from the landfill or the goodwill) and stylish or cool. I realize that style is personal so if this isn't yours I'm okay with that. I saved a lot of jeans. It helps if you drop a few pounds and can use your fat jeans, that means the quilt will double as a good reminder to get your heiney off the couch later. I also had a big blanket that was still really soft on one side but not so soft on the other. Sorry I did not take pictures during the process. Forgive me? I'll try and be extra clear on directions.
First cut out all your jeans, I used 5 adult pairs and 5 kid pairs. I left the hems on mine (they will come in to play later) and tried to make them as straight as possible. Once have all of the big pieces in one pile and the scraps in another decide how big and what shape you want to make. Mine is a rectangle. I wanted for us to be able to sit on the couch together and have it cover the length of the couch plus some and be wide enough to snuggle up in, but still go over our toes. The only thing I used to measure with was my couch. Because I'm a rogue sewer.
I laid all of my pieces out so that the hems were facing out making the border. Next I trimmed and pinned. You can do the next part one of two ways. You can sew the pieces together with the edges facing out or right side up, which will give a really cool fraying effect that will get softer with each wash or you can sew them where they face down and will be on the inside of the blanket which will be smoother. The choice is up to you, I wanted the fray! Once you have sewn all of the pieces together now is the time to add any embellishments that you want. I added a few pockets for fun.
Now for the backing with that other blanket. I put the jean quilt top on the floor. You could have made yours the same size as the blanket to begin with but I didn't. I was out of jeans! I made sure that the edges were lined up with the edges of the jean quilt. I then cut out the middle and re-sewed the blanket up the middle. This way the finished edges were all on the outside. With wrong sides together I pinned the blanket bottom and jean quilt top together and sewed along the edges. Because the edges were already finished it gave it a double layered look and it was a lot less work than a normal blanket or quilt. Note: It really helps to do this part during nap time, otherwise people will bedriving you crazy helping you.
The verdict? This is my families favorite blanket. It is so big that we can all use it and it is so so so warm! I've been working hard at saving all of my newly too big jeans as well. It helps to have kids that are growing like weeds as well. I want to make a more traditional quilt with jean blocks, but that one will probably take much longer to put together. This one took about 3 hours total cutting, piecing and sewing. Of course that 3 hours was divided up over about 2 days.
I'll show you what I did with my scraps tomorrow. A jean quilt needs some jean pillows right?
First cut out all your jeans, I used 5 adult pairs and 5 kid pairs. I left the hems on mine (they will come in to play later) and tried to make them as straight as possible. Once have all of the big pieces in one pile and the scraps in another decide how big and what shape you want to make. Mine is a rectangle. I wanted for us to be able to sit on the couch together and have it cover the length of the couch plus some and be wide enough to snuggle up in, but still go over our toes. The only thing I used to measure with was my couch. Because I'm a rogue sewer.
I laid all of my pieces out so that the hems were facing out making the border. Next I trimmed and pinned. You can do the next part one of two ways. You can sew the pieces together with the edges facing out or right side up, which will give a really cool fraying effect that will get softer with each wash or you can sew them where they face down and will be on the inside of the blanket which will be smoother. The choice is up to you, I wanted the fray! Once you have sewn all of the pieces together now is the time to add any embellishments that you want. I added a few pockets for fun.
Now for the backing with that other blanket. I put the jean quilt top on the floor. You could have made yours the same size as the blanket to begin with but I didn't. I was out of jeans! I made sure that the edges were lined up with the edges of the jean quilt. I then cut out the middle and re-sewed the blanket up the middle. This way the finished edges were all on the outside. With wrong sides together I pinned the blanket bottom and jean quilt top together and sewed along the edges. Because the edges were already finished it gave it a double layered look and it was a lot less work than a normal blanket or quilt. Note: It really helps to do this part during nap time, otherwise people will be
The verdict? This is my families favorite blanket. It is so big that we can all use it and it is so so so warm! I've been working hard at saving all of my newly too big jeans as well. It helps to have kids that are growing like weeds as well. I want to make a more traditional quilt with jean blocks, but that one will probably take much longer to put together. This one took about 3 hours total cutting, piecing and sewing. Of course that 3 hours was divided up over about 2 days.
| It spans the entire length of the couch- no complaining about not having enough! |
| Every time I wash it they fray gets better and softer. |
| Had to add some pockets! |
| The super soft side. |
| Here is a closer look at the edge. |
| It also gets softer with every wash and its really warm! |
Labels:
crafts,
DIY,
Easy,
family,
Green Home,
Home Decor,
jeans,
recycled,
Remodel,
upcycled
Subscribe to:
Posts (Atom)